WAVScribe User Manual
Everything you need to read, edit, and batch-process metadata in your WAV files, from your first edit to batch renaming an entire library.
Part 1: Getting Started
Introduction
WAVScribe is a Windows desktop application for reading, editing, and batch-processing metadata embedded inside WAV audio files. It handles the full metadata stack - BWF/bext, iXML, XMP, LIST/INFO, and ID3 - and writes all of them simultaneously in a single operation. The result is metadata that every tool in the audio production chain can read, regardless of which standard that tool prefers.
WAVScribe is built for sound designers, field recordists, sound library producers, post-production engineers, game audio professionals, and anyone who needs to embed and manage metadata in WAV files. It assumes familiarity with audio workflows but handles the metadata complexity so users don't have to think about which chunk type goes where.
Why Metadata Gets Lost
WAV files can store the same piece of information - a description, a category, the designer's name - in multiple locations using different standards. A DAW might read from BWF/bext. A sound library manager might read from iXML. An Adobe tool might read from XMP. When a file passes through a tool that only writes to one of these locations, the others go stale or empty. Metadata appears to "disappear" even though it was never removed - it simply wasn't written to the location the next tool looks at.
WAVScribe solves this by writing every editable field to every applicable location at once. When metadata is embedded, it populates BWF/bext, iXML (including the USER block), XMP, LIST/INFO, and ID3 in a single atomic operation. Nothing is left behind.
System Requirements
- Operating System: Windows 10 or later (64-bit)
- Disk Space: 153 MB
- Display: Minimum 1280×720; 1920×1080 or higher recommended
- Audio: Any Windows-compatible audio output device (WASAPI shared mode)
- Storage: WAVScribe supports local drives, external drives, and network (NAS) storage. Cloud-synced folders (Dropbox, OneDrive, Google Drive) are not officially supported, but Dropbox and Google Drive folders have worked successfully in testing with active sync clients. The caution to keep in mind is that sync activity during edits or batch renames can lock or modify files while WAVScribe is working with them, which can produce conflicted copies or reverted changes. For important batch operations, the safest approach is to work on a local drive and let the sync client upload the changes afterward. Online-only placeholder files can stall the application while they download, so ensure files are fully downloaded before editing. On network (NAS/SMB) shares, the Windows "Read-only" file attribute is not enforced - WAVScribe, like any program, can still save changes to a file marked read-only. To truly protect files on a NAS, use the share's own permissions.
Installation
Run the WAVScribe installer and follow the on-screen prompts. The installer places the application in the standard Program Files directory and creates a Start Menu shortcut.
On first launch, WAVScribe creates a configuration directory at:
%LOCALAPPDATA%\WAVScribe
This directory stores preferences, custom field definitions, UDA profiles, and saved templates. It is never modified by the installer and persists across application updates.
Application logs are stored separately at:
%LOCALAPPDATA%\WAVScribe\logs\
The first time you launch WAVScribe, it asks you to activate your license, which needs an internet connection. For the two-computer limit, moving your license to a new machine, and working offline, see Licensing and Activation in Part 5.
Application Overview
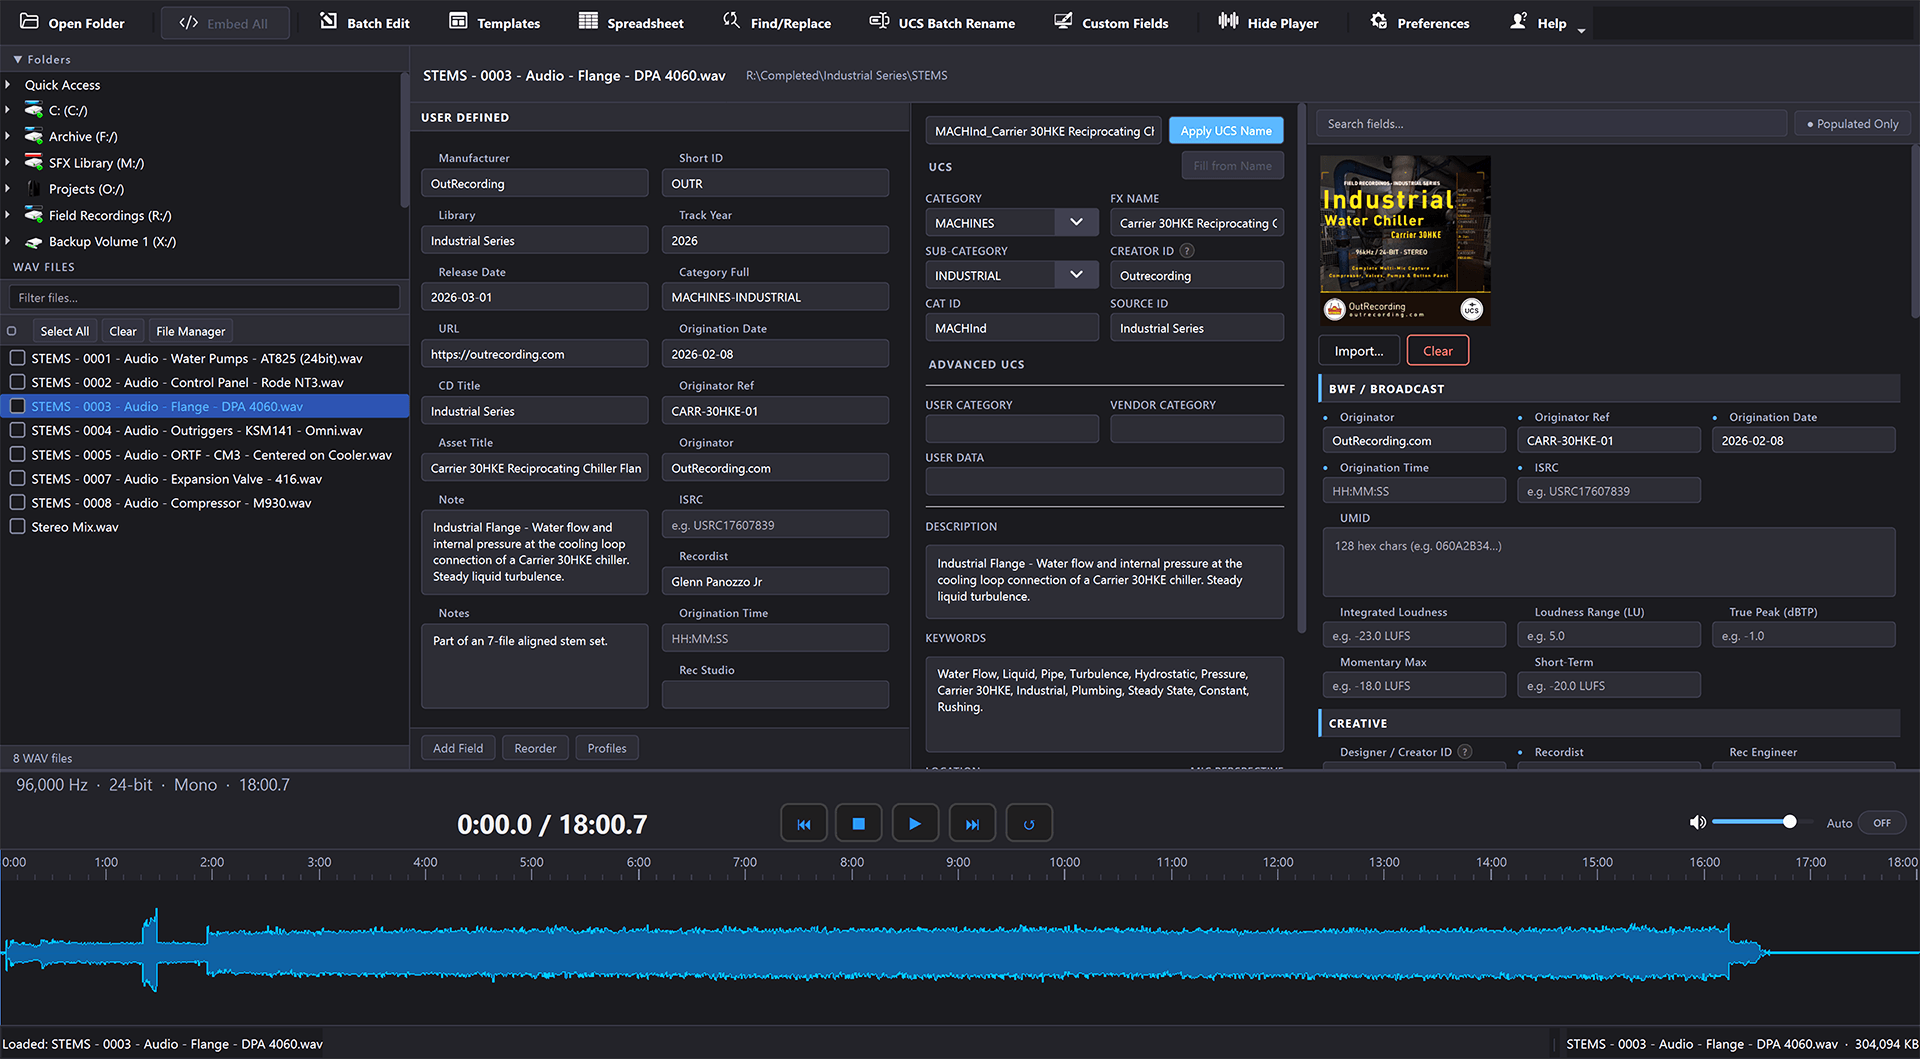
WAVScribe uses a three-panel layout with an integrated audio player at the bottom.
Title Bar and Toolbar
The title bar displays the application name. Directly below it is the toolbar, which provides access to all of WAVScribe's major functions. There is no separate menu bar - everything is accessible from the toolbar.

From left to right, the toolbar buttons are:
| Button | Function |
|---|---|
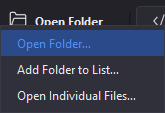
| Open Folder | Opens a dropdown menu with three options: Open Folder… (loads a new folder, replacing the current file list), Add Folder to List… (appends files from another folder to the existing list), and Open Individual Files… (select specific WAV files from any location). |
| Embed All | Writes metadata to all files that have pending changes. Greyed out when no files have unsaved edits. |
| Batch Edit | Opens the Batch Edit dialog for applying a single value to a field across all checked files. |
| Templates | Opens the Templates dialog for saving and applying metadata templates. |
| Spreadsheet | Opens the Spreadsheet dialog for exporting and importing metadata via XLSX or CSV. Unlike other batch tools, the Spreadsheet operates on all files in the file list - checkbox selection is not required. It can also scan a folder directly without first loading those files into WAVScribe. |
| Find/Replace | Opens Find & Replace for searching and replacing text within a specific field across checked files. |
| UCS Batch Rename | Opens the UCS Batch Rename dialog for renaming files according to UCS naming conventions. |
| Custom Fields | Opens the Custom Fields manager for creating user-defined metadata fields. |
| Hide Player / Show Player | Toggles the audio player panel. When hidden, the label changes to "Show Player" and the metadata editing area expands to use the freed up space. |
| Preferences | Opens the Preferences dialog for configuring application behavior. |
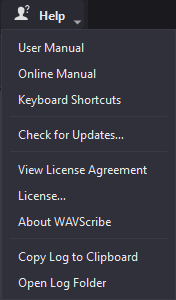
| Help | Opens a dropdown menu with: User Manual, Online Manual, Keyboard Shortcuts, Check for Updates, View License Agreement, License information, About WAVScribe, Copy Log to Clipboard, and Open Log Folder. |
Hiding and Restoring the Toolbar
The toolbar can be hidden to maximize screen space. Right-click anywhere on the toolbar and select Hide Toolbar to hide it.
When the toolbar is hidden, a ▲ Show Toolbar button appears in the status bar at the bottom right of the window, rendered in blue. Click it to restore the toolbar. The button is only visible when the toolbar is hidden.
The toolbar's visibility state is remembered across application restarts. On a fresh install, the toolbar is visible by default.
Update Check
WAVScribe checks for updates automatically on startup. This check is non-blocking and does not send any user data beyond what a standard web request includes. If a newer version is available, a dismissible banner appears at the top of the main window. Updates can also be checked manually via Help → Check for Updates….
The File Browser (Left Panel)
The left panel is the file browser. It has two sections: the folder tree at the top and the file list below.
Folder Tree
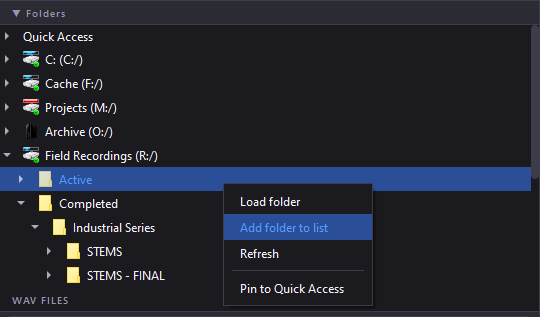
The folder tree displays the system's drive and folder hierarchy. Right click a folder to load its WAV files into the file list below. Expand folders by clicking the arrow to the left of the folder name or by double clicking the folder.
Right-clicking a folder in the tree presents three options:
- Load folder - Loads that folder's WAV files into the file list, replacing any currently loaded files.
- Add folder to list - Appends that folder's WAV files to the existing file list without removing files already loaded.
- Refresh - Rescans the folder's direct children so that subfolders added, moved, or deleted externally (via Explorer or command line) appear correctly in the tree without restarting WAVScribe. Deeper expansion state under the refreshed folder is not preserved.
A folder can also be loaded with the keyboard. Click into the folder tree to give it focus, highlight a folder with the arrow keys, and press Enter. This works exactly like right-clicking the folder and choosing Load folder, including the subfolder prompt and the unsaved-changes check.
External changes to loaded files - If another program replaces or rewrites a file while it is loaded in WAVScribe, the panel keeps showing the file as it was when it loaded. Reload the file, or reload its folder, to see the new contents.
The Folders section can be collapsed by clicking its header bar. This frees up vertical space for the file list below. The collapsed or expanded state is remembered between sessions.
The WAV FILES header doubles as a resize handle for the split between the folder tree and the file list. Hover it and the cursor becomes a vertical resize arrow; drag up or down to change how much room each section gets. Dragging up stops while about two rows of the folder tree remain visible; to hide the tree completely, collapse the Folders section as described above. The chosen split is remembered between sessions.
Quick Access
A Quick Access section sits at the top of the folder tree, above the drive list. It starts empty and holds folders you pin for quick reach. There are two ways to add a folder: right-click Quick Access and choose Add Folder..., or right-click any folder in the tree and choose Pin to Quick Access. To remove a pin, right-click it and choose Remove from Quick Access. Network (UNC) paths cannot be pinned, and pinning the same folder twice does nothing.
Each pin shows the folder name with its drive letter, for example "Sound Effects (F:)", and hovering over a pin shows its full path. Pins behave exactly like normal folders in the tree: double-click to expand into subfolders, press Enter to load the folder into the file list, and use the right-click menu for Load folder, Add folder to list, and Refresh.
If a pin's drive goes offline or is unplugged, the pin disappears along with the drive and returns automatically when the drive comes back. The pin itself is never lost. Pins are remembered across sessions.
File List
Below the folder tree, the WAV FILES section displays all loaded files. Each file entry has two interactive elements: a checkbox on the left and the filename as a clickable label.
Understanding the difference between these two interactions is important:
Checking a file (clicking the checkbox) marks it for batch operations. Tools like Batch Edit, Templates, Find/Replace, and UCS Batch Rename operate on checked files. If no files are checked when opening one of these tools, WAVScribe displays a message asking to select files first.
Selecting a file (clicking the filename) highlights it and loads its metadata into the editing panels. This is the file currently being viewed and edited. Selecting a file does not check it, and checking a file does not select it - the two actions are independent.
Multiple files can be highlighted using standard Windows selection shortcuts: hold Shift and click to select a range, or hold Ctrl and click to add individual files to the selection. Multi-selection is used for operations like Remove and Paste Metadata.
A filter bar at the top of the file list allows typing to narrow the visible files by name. This filters the display only - it does not remove files from the list.
Below the filter bar, three buttons and the master checkbox provide list management:
- Master checkbox - Controls the checked state of all files at once. It is tri-state: fully checked (all files checked), unchecked (no files checked), or partially checked (some files checked). Clicking it toggles between all-checked and all-unchecked.
- Shift-click range-fill - Click any file's checkbox to set its state, then shift-click another file's checkbox - every checkbox between them (including the shift-clicked one) is set to the same state. This works in both directions: shift-click to extend a check across a range, or to extend an uncheck.
- Select All - Highlights all files in the list (equivalent to Ctrl+A). This is for highlighting, not checking - use it before pressing Delete to remove multiple files, or before Paste Metadata to paste to all files.
- Clear - Removes all files from the list. This does not delete any files from disk.
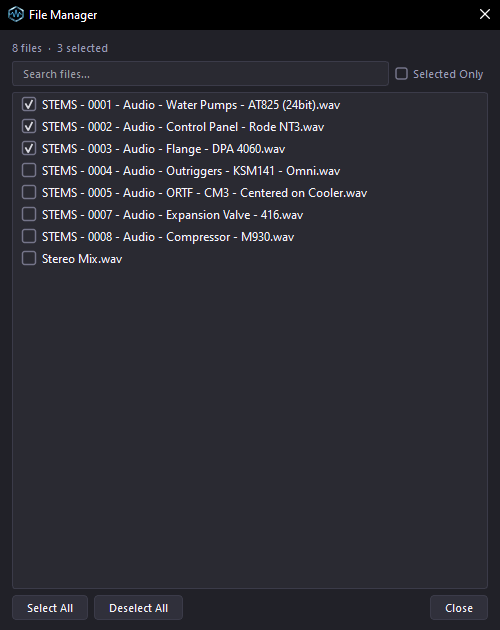
- File Manager - Opens a resizable dialog for managing file selections in large collections. The File Manager provides its own search filter, a "Selected Only" toggle to show only checked files, and Select All / Deselect All buttons. The dialog can be resized by dragging any edge. This is useful when filenames are long and get truncated in the main file list - the File Manager provides a wider view of the full filenames.
Right-Click Context Menu
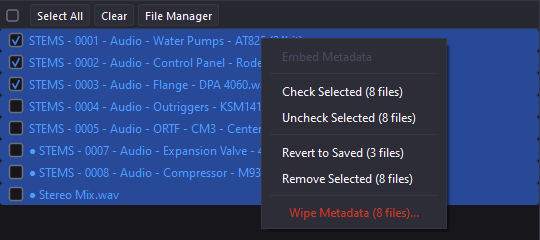
Right-clicking a file in the file list opens a context menu. The available options depend on the state of the selected file(s). The Wipe Metadata option appears at the bottom of every menu state, separated from the other actions and styled in red to flag its destructive nature.
Single file, no pending changes (clean):
- Embed Metadata (greyed out - nothing to embed)
- Check Selected / Uncheck Selected
- Copy Metadata
- Remove
- Wipe Metadata…
Single file, with pending changes (dirty): - Embed Metadata - Check Selected / Uncheck Selected - Copy Metadata - Revert to Saved - Remove - Wipe Metadata…
Multiple files selected:
- Embed Metadata - enabled when the right-clicked file has pending changes; greyed out otherwise
- Check Selected (N files) / Uncheck Selected (N files)
- Revert to Saved - appears when at least one selected file has pending changes
- Paste Metadata (N files) - appears when metadata has been previously copied via Copy Metadata
- Remove Selected (N files)
- Wipe Metadata (N files)…
Embed Metadata writes the current metadata to the file on disk - the same as pressing Ctrl+S. Check Selected / Uncheck Selected sets or clears the checkbox on every currently highlighted file - useful for targeting a specific subset of files for a batch operation without clicking each checkbox individually. The master tri-state checkbox and the count label update to reflect the new state. Copy Metadata copies all editable field values from the selected file to an internal clipboard. Paste Metadata applies the previously copied values to the highlighted file(s). Revert to Saved discards pending changes and re-reads the file's metadata from disk. Remove removes the file(s) from the list without deleting them from disk. Wipe Metadata permanently removes all metadata from the selected file(s) - see "Wiping Metadata" below for details.
Wiping Metadata
Wipe Metadata removes every metadata chunk from the selected file(s), reverting them to a state containing only audio-essential data. It is intended for cases where files arrive with conflicting, corrupted, or unwanted third-party metadata and a clean slate is needed before re-tagging.
Invocation. Right-click one or more files and choose Wipe Metadata at the bottom of the context menu.
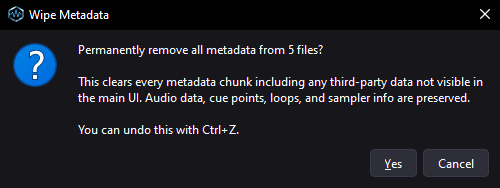
Confirmation. A dialog asks for confirmation before any files are modified:
Permanently remove all metadata from N file(s)?
This clears every metadata chunk including any third-party data not visible in the main UI. Audio data, cue points, loops, and sampler info are preserved.
You can undo this with Ctrl+Z.
If any of the selected files have unsaved edits, the dialog adds a warning line at the top - for example: "2 of these files have unsaved edits - those edits will be lost on wipe."
What is removed. All metadata chunks managed by WAVScribe and all third-party passthrough chunks: BWF/bext, iXML, XMP, LIST/INFO (except adtl), ID3, cart, DISP, chna, AXML, and any other vendor or unknown chunks.
What is preserved. Audio-essential and audio-adjacent chunks are kept byte-for-byte: fmt, data (the audio samples themselves are bit-for-bit identical before and after wipe), fact, ds64 (RF64 / BW64 / large-file markers), cue (cue points), plst (playlist), smpl (sampler info - loop points, MIDI keys), inst (instrument info), and LIST/adtl (cue point text labels).
Direct-to-disk. Wipe Metadata writes immediately. It is not staged in the pending-changes model - wiped files appear clean in the file list as soon as the wipe completes. The currently displayed file's metadata panel refreshes automatically to reflect the wiped state.
Multi-file behavior. A modal progress dialog shows the current file being wiped with a Cancel button. Files already wiped when Cancel is pressed remain wiped; remaining files are skipped. Per-file errors (file locked by another application, disk full, etc.) do not abort the batch - they are collected and shown in a Wipe Complete result dialog at the end. The status bar confirms: "Wiped N file(s)".
Undo. Wipe Metadata is undoable with Ctrl+Z. Undo restores every removed chunk byte-for-byte, including third-party fields and unmapped sub-fields that WAVScribe doesn't surface in its UI (custom iXML USER keys, vendor-specific Steinberg attributes, ID3 frames such as TPE2 or TORY, etc.). All hidden data is fully recovered. A multi-file wipe creates a single undo snapshot - one Ctrl+Z restores all files in the batch. Undo remains available until the next destructive operation (next embed, next wipe, or application close).
Error handling. A file with a missing or unreadable fmt chunk never gets this far - WAVScribe validates every file's structure when scanning a folder, and files that fail are not loaded at all. This safeguard covers a different situation: a file that was healthy when loaded but has since been changed on disk by something outside WAVScribe - another program writing to it, a failed copy or sync, or a network interruption. WAVScribe re-reads every file from disk at the moment it writes, so if the structure no longer checks out, the wipe refuses and the file is left untouched - nothing is written. The same pre-write check protects every operation that modifies files, not just the wipe. If a post-wipe integrity check fails, the error is reported in the result dialog.
The Pending Changes Indicator
When any field is modified for a file, the filename in the file list changes appearance: it is prefixed with a filled circle (●) and displayed in amber text. This is the pending changes indicator, or "dirty" file. It means the file has unsaved edits in memory that have not yet been written to disk.
The indicator clears when the file is embedded (Ctrl+S or Embed All) or reverted (Revert to Saved).
Switching between files preserves pending edits in memory. Editing File A, clicking File B to view it, and then clicking back to File A will restore the unsaved edits for File A.
Loading Files
There are several ways to load files into WAVScribe:
From the toolbar: Click Open Folder and choose one of the three options - Open Folder, Add Folder to List, or Open Individual Files.
From the folder tree: Navigate to a folder and right-click and choose Load folder or Add folder to list.
Drag and drop: Drag WAV files or folders from Windows Explorer directly into the file list area. Folders are scanned for WAV files. Individual files are added to the existing list.
When loading a folder, WAVScribe will ask whether to include subfolders. If subfolders are included, all WAV files found recursively are added to the file list.
Large folders: When loading a folder with 200 or more WAV files, a progress dialog appears showing the file count, a progress bar, and a Cancel button. Cancelling leaves the existing file list completely unchanged. For very large folders (5,000+ files), a modal scanning dialog appears immediately while the folder is being read - the main window remains responsive during the scan.
Removing files from the list: Highlight one or more files and press the Delete key, or right-click and choose Remove / Remove Selected. The first time Delete is pressed in a session, a confirmation dialog appears explaining that this removes files from the list only - not from disk. This warning is shown once per session.
External Drive Disconnect and Reconnect
WAVScribe handles unplanned drive disconnects gracefully. If an external drive (USB, network share, or NAS) goes offline while files from that drive are loaded - including files with unsaved edits - work is preserved.
When a drive disconnects:
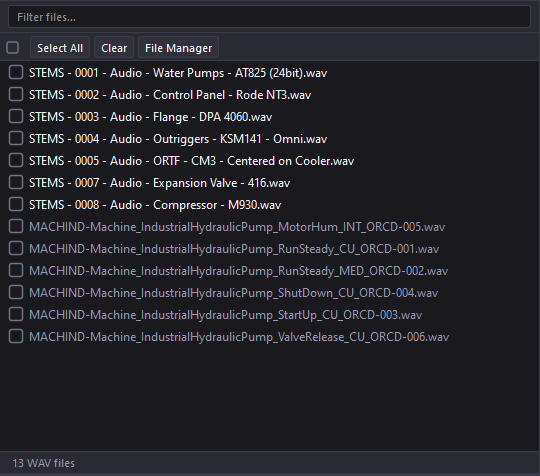
Files from the offline drive remain in the file list but appear dimmed (greyed out). Any unsaved edits to those files are held in memory. WAVScribe shows a notification offering two choices: remove the offline files from the list (clearing them and any unsaved edits), or keep them in place and wait for the drive to reconnect. Clicking on a dimmed file shows a status message indicating which drive needs to be reconnected.
When the drive reconnects:
The dimmed files become available again automatically. Any unsaved edits that were held are still present and ready to save - the pending changes indicator (●) returns on files with unsaved edits. Normal operations, including Embed All, work on these files again.
Embed All with offline drives:
If some files are on offline drives when Embed All is clicked, WAVScribe shows a dialog explaining which drives are offline. The option is given to embed only the files on online drives (offline files stay dirty, waiting for reconnect) or to cancel and reconnect first.
File Count and Status Bar
The bottom of the file browser panel shows the total file count (e.g., "39 WAV files").
At the very bottom of the application window, a status bar displays operational messages on the left (e.g., "Loaded: example.wav") and the currently-selected file's name and size on the right (e.g., "example.wav · 17,048 KB").
The Metadata Editor
The Metadata Editor is where metadata is viewed and edited. When no file is selected, it displays "No file selected" in the waveform display area. When a file is loaded, the filename appears at the top along with its full file path on the right side.
The editor is divided into three side-by-side columns: User Defined on the left, the Core Column in the middle, and the Master Column on the right.
User Defined (Left Column)
The left column is the User Defined workspace. This area is initially empty, showing a hint: "Pin fields from the Master List to build your workspace →".
User Defined fields are created by pinning fields from the Master Column. Fields in the Core Column are not pinnable - they're already the most commonly used fields and remain visible by default. This allows each user to build a custom workspace combining the Core Column's always-visible fields with their own selected pins, arranged in a grid layout. Fields the user wants quick access to without scrolling the Master Column can be pinned here.
At the bottom of the User Defined workspace, three buttons are always visible:
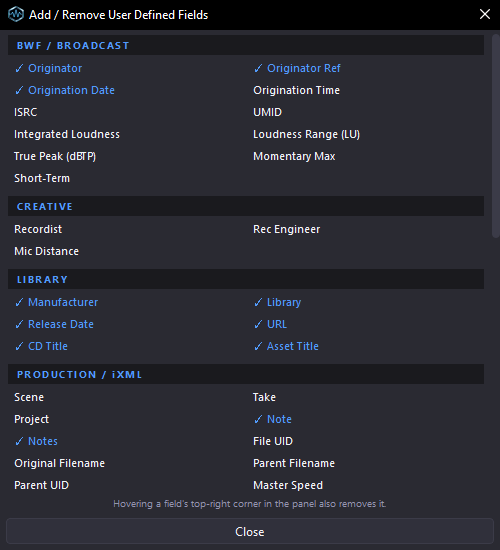
- Add Field - Opens the Add / Remove User Defined Fields window for adding fields to and removing them from the workspace.
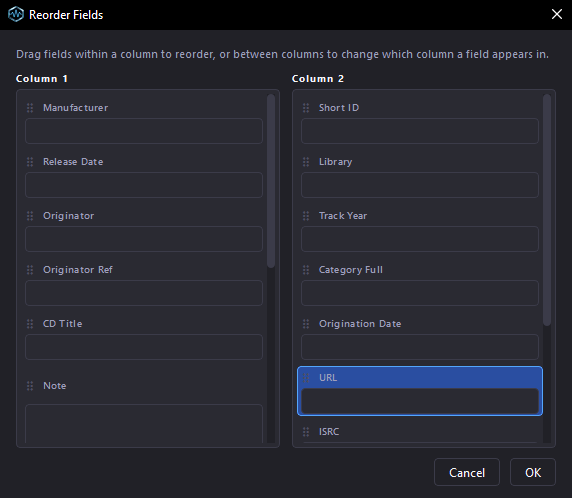
- Reorder - Opens the Reorder Fields dialog for rearranging pinned fields within or between columns. See the Reordering Pinned Fields section in Part 2.
- Profiles - Opens the UDA Profiles dialog for saving and loading User Defined Area configurations. This allows switching between different workspace layouts for different projects or workflows.
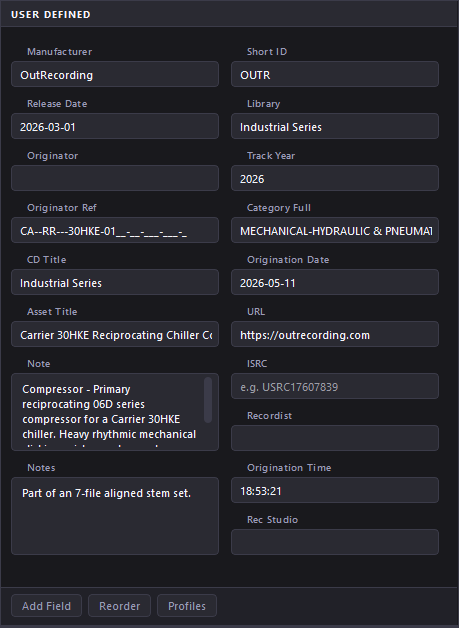
Core Column (Center)
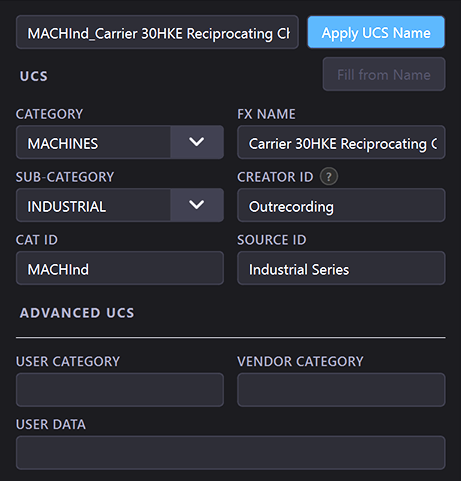
The Core Column contains the metadata fields most commonly used in day-to-day tagging. At the top is a filename bar with a text field showing the assembled UCS filename and an Apply UCS Name button. Clicking this button renames the file on disk using the current UCS field values (CatID, FX Name, Creator ID, Source ID, plus optional User Category, Vendor Category, and User Data). A confirmation dialog is shown before the rename occurs. The required UCS fields must be populated and CatID must be a valid UCS v8.2.1 identifier, or the rename is blocked with an explanatory message.
Below the filename bar, the fields are grouped into sections:
UCS - The core Universal Category System fields:
- Category - Dropdown with all 82 UCS v8.2.1 categories. Also accepts freeform text for non-UCS values.
- Sub-Category - Dropdown that filters dynamically based on the selected Category. Also accepts freeform text.
- Cat ID - Auto-populates from Category + Sub-Category when both are valid UCS values (e.g., "AIRBlow", "DRWRPlas"). Can also be entered manually.
- FX Name - The descriptive sound name. Spaces are preserved per the UCS specification.
- Creator ID - Identifies the sound designer or creator.
- Source ID - Identifies the source library or collection.
Advanced UCS - Additional UCS-related fields:
- User Category - An optional user-defined category extension.
- Vendor Category - An optional vendor-specific category.
- User Data - A freeform field for any additional user data.
Description - The BWF description field. This field has a 256-byte limit (not 256 characters - multi-byte characters such as accented letters or CJK text consume more than one byte each). The main panel prevents typing past this limit at the keystroke level. If a value exceeding the limit arrives via CSV import, paste, or template application, WAVScribe truncates at a safe character boundary and shows a summary after embed.
Keywords - Comma-separated keywords for the file.
Location - Recording location.
Microphone - Microphone(s) used for the recording.
Mic Perspective - Microphone distance or perspective (e.g., CU | EXT).
Master Column (Right)
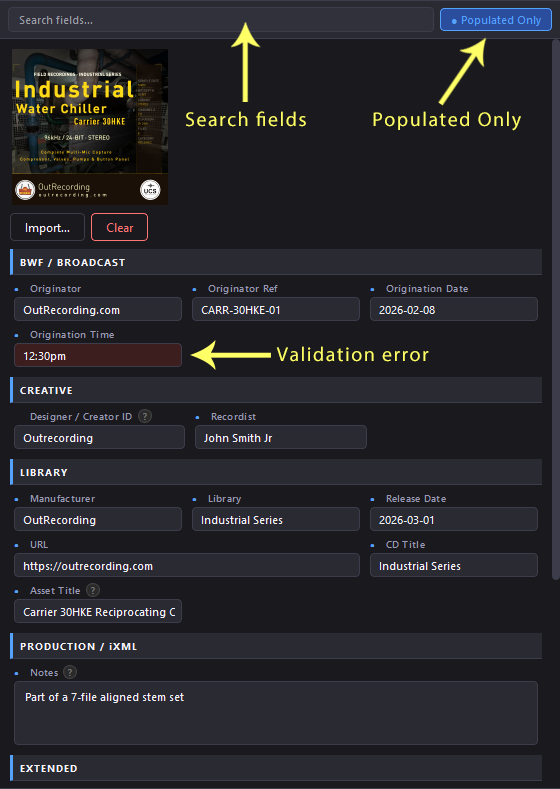
The Master Column contains additional metadata sections that are less frequently edited but essential for complete metadata coverage.
At the top of the Master Column are two controls:
- Search fields - A search box that filters all visible fields in the column by label name. Type "loud" to quickly find the loudness fields, for example.
- Populated Only - A toggle button that, when active, hides all empty fields and shows only fields that contain data. This is useful for quickly reviewing what metadata a file already contains.
Below the search and filter controls, the column is organized into sections:
Artwork - Displays the file's embedded album art (if present) with Import and Clear buttons. WAVScribe supports PNG and JPEG artwork up to approximately 64 megapixels, stored in the ID3 chunk.
BWF / Broadcast - Broadcast Wave Format fields:
- Originator (32-byte limit)
- Originator Ref (32-byte limit)
- Origination Date (YYYY-MM-DD format, validated)
- Origination Time (HH:MM:SS format, validated)
- ISRC (International Standard Recording Code)
- UMID (Unique Material Identifier - 128 hex characters, validated)
- Five loudness fields: Integrated Loudness, Loudness Range (LU), True Peak (dBTP), Momentary Max, Short-Term - all displayed with 2 decimal place precision
Fields with format requirements show a red tint when the entered value is nonstandard. Some conditions block embedding (structural issues like an invalid UMID or non-numeric loudness value), while others are warnings only (nonstandard date, time, or ISRC formats) - the value is written as-is if the user proceeds. See Part 2 for the full validation rules.
Creative - Fields related to the sound's creation:
- Designer / Creator ID
- Recordist
- Rec Engineer
- Mic Distance
Library - Fields for library organization:
- Manufacturer
- Library
- Release Date
- URL
- CD Title
- Asset Title
Production / iXML - Fields from the iXML standard used in production workflows: Scene, Take, Project, Note, Notes, File UID, Original Filename, Parent Filename, Parent UID, Master Speed, Current Speed, Speed Note, TC Flag, TC Rate, Session, State, Text Language, Content Type, Editor, Mixer, Rec Studio, and FX Chain Name.
Extended - Additional fields including Rating (star widget), Open Tier, Show, Show Category, Show Sub-Category, Long ID, Short ID, Era, Tape, Track, Track Year, Index, Volume, Rec Medium, Rec Type, Shoot Date, GPS Latitude, GPS Longitude, GPS Altitude, Source, Category Full, and User Comments.
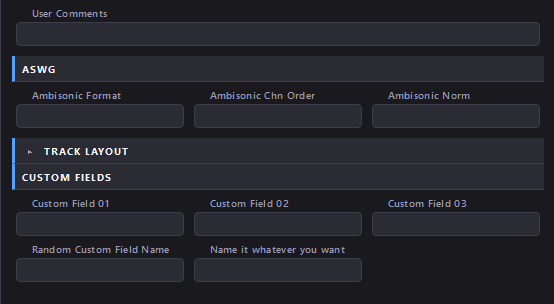
ASWG - Fields from the Audio Standards Working Group extension to iXML, used for richer cataloging in modern sound libraries. Fields include Ambisonic Format, Ambisonic Channel Order, and Ambisonic Normalization.
Track Layout - A per-channel layout editor for files with multi-channel audio. This section is collapsible (click its header to expand or collapse it); the other sections are always expanded. The section can hold up to 128 channel rows, so collapsing it keeps the Master Column compact when working with files that have many channels. Detailed coverage of the Track Layout editor is in Part 2.
The Audio Player
The audio player occupies the bottom of the window and can be toggled with the Hide Player / Show Player toolbar button or the Ctrl+P keyboard shortcut. Hiding the player reveals more of the metadata editing area, which is particularly useful on smaller screens or when working with many fields.
The boundary between the audio player and the metadata panels above is a draggable splitter. Drag the handle up or down to adjust how much vertical space the player occupies. This allows balancing waveform visibility against metadata editing space to suit the current task and screen size.
When a file is selected, the player displays:
- Technical strip - Sample rate, bit depth, channel count, and duration (e.g., "48,000 Hz · 16-bit · 8ch · 0:31.7"). For RF64 or BW64 files, that format label appears to the right of the duration.
- Time display - Current position and total duration.
- Transport controls - Back, Stop, Play/Pause, Forward, and Loop buttons. The Play button appears blue when idle and amber during playback.
- Volume slider - Adjusts playback volume.
- Gain slider - Shown for float-format files (such as 32-bit float). Adjusts the preview level and the waveform display.
- Auto toggle - When set to ON, playback begins automatically when a new file is selected. Turning Auto ON while a file is already selected starts that file playing immediately, restarting from the beginning if it had already played to the end. Default is OFF.
Below the transport controls, the waveform display shows the audio content. Mono and stereo files display one or two waveform lanes respectively. Files with 3 to 32 channels display each channel as a separate lane when there is enough vertical space; if the waveform area is too small to fit them all legibly, the display falls back to a stereo mixdown. Resizing the player via the splitter handle shifts between these modes in real time. Files with more than 32 channels are always shown as a stereo mixdown with a notice.
Multichannel playback. Files with more than two channels play back as a stereo preview. WAVScribe builds the fold-down from the file's actual channel layout - the embedded channel mask when the file declares one, or standard layouts (LCR, quad, 5.0, 5.1, 7.1) matched by channel count when it does not - so left-side channels are heard in the left ear, right-side channels in the right, and center channels in both. The LFE channel of 5.1 and 7.1 files is excluded from the preview, as is standard practice for stereo fold-downs. Ambisonic B-format files are decoded to a proper stereo image rather than summed. Files with unusual channel counts still play, with channels alternating between the left and right ears. Mono and stereo files play unmodified. Levels are balanced automatically so the fold-down cannot clip. This affects playback only - the waveform display continues to show every channel separately, as described above.
Gain (float files). 32-bit float files can contain peaks louder than full scale (above 0 dBFS). On playback those peaks hit the audio device's ceiling and clip, producing distortion that is an artifact of the preview. The Gain slider, just left of the Volume slider, lowers the preview level until the file plays cleanly, and it also works upward for auditioning very quiet material. As you move it, the waveform scales with the setting, so an over-loud file's flat-topped peaks shrink back inside the lane. Gain changes only what you hear and see. It is never written to the file, and it does not affect metadata, embedding, or undo.
Click anywhere on the waveform to jump playback to that position. Use the mouse wheel over the waveform to zoom in and out horizontally for more precise navigation.
Audio continues playing when the player panel is hidden via the Hide Player button or Ctrl+P. Hiding the panel only removes the visual display - playback is not interrupted.
The waveform color can be customized in Preferences (default is blue).
Playback uses WASAPI shared mode, which allows WAVScribe to coexist with DAWs and other audio applications without device conflicts.

Preferences
The Preferences dialog is accessible from the toolbar. It contains the following settings:
Display
- Interface Size - A dropdown with five options: Small, Normal, Large, Larger, and Largest. Each scales the entire application - text, fields, buttons, the audio player, and dialogs all resize together; it is not a font-only setting. Normal is the standard size; Small is about 15% more compact, and the three larger sizes run from about 25% up to double. The change takes effect after restarting WAVScribe - a hint appears under the dropdown, and a notice confirms this when OK is clicked. The setting persists across sessions. Sizes too big for the current display are shown in the list as unavailable; the size currently in use is always available, so you can switch down at any time. On its very first launch, WAVScribe chooses a size for you based on your display and Windows scaling - a 4K display starts at one of the larger sizes, a typical 1080p setup starts at Normal, and a small, heavily scaled screen starts at Small. This happens only once, and any choice you make yourself is always kept and never overridden. If a saved size ever stops fitting the display WAVScribe starts on - for example, after moving to a smaller monitor - it starts at the largest size that fits, saves that choice, and tells you it did so.
- Highlight metadata conflicts on file load - Shows amber borders on fields where values differ across metadata blocks (e.g., BWF says one thing, iXML says another). Enabled by default. See the Conflict Detection section in Part 2 for a full explanation.
- Highlight field format errors - Shows a red background on fields with nonstandard values (date format, time format, ISRC, UMID, loudness) when leaving the field. Nonstandard values are not necessarily blocked - see Part 2 for which conditions block embedding and which are warnings only. Enabled by default.
- Highlight UCS non-compliance - Highlights Category, Sub-Category, and CatID values not found in UCS v8.2.1. Disable this if UCS naming is not part of the workflow. Enabled by default.
Confirmations
- Show embed report after successful batch operations (failures are always reported) - When on (the default), an Embed Complete report appears after every Embed All batch. When off, a fully successful batch finishes quietly with a status bar note instead, but any batch containing a failure still shows the report. Single-file embeds are not affected.
- Confirm before embedding files with nonstandard values - When enabled, the embed confirmation dialog includes a summary of any nonstandard values (date/time format, ISRC format, byte-overflow truncations) that will be written or truncated. Disabled by default - enable this for workflows that require strict format compliance.
- Show warning before editing loudness fields - Displays a confirmation prompt when editing loudness fields that already contain a value. This protects against accidentally overwriting measured loudness data. Enabled by default.
Audio
- Waveform Color - Click the color swatch to choose a custom waveform color.
- Output Device - Select the audio output device from the dropdown. Defaults to "System Default Device." Uses WASAPI shared mode for DAW compatibility.
Keyboard Shortcuts
The Preferences dialog includes a reference table of all keyboard shortcuts, reproduced below. Keyboard shortcuts can also be viewed from the toolbar via Help → Keyboard Shortcuts.
Keyboard Shortcuts
| Shortcut | Action |
|---|---|
| Ctrl+S | Embed current file |
| Ctrl+Z | Undo Last Embed |
| Ctrl+A | Select all files in list |
| Delete | Remove highlighted files from list (not from disk; when file list has focus) |
| Enter | Load highlighted folder (when the folder tree has focus) |
| Ctrl+P | Toggle audio player panel |
| Space | Play / Pause audio (when cursor is not in a text field) |
| Ctrl+Space | Quick-View metadata card |
| Ctrl+I | Extended Metadata dialog |
| Ctrl+Shift+C | Open Spreadsheet |
| Ctrl+Shift+E | Open Batch Edit |
| Ctrl+Shift+T | Open Templates |
| Ctrl+Shift+R | UCS Batch Rename |
| Ctrl+Shift+B | Manage Custom Fields |
| Ctrl+H | Find / Replace |
Quick Start: Your First Edit
This walkthrough covers the basic single-file editing workflow. Batch operations and advanced features are covered in later parts of this manual.
1. Load a folder
Click Open Folder in the toolbar and select Open Folder. Navigate to a folder containing WAV files and click OK. If the folder contains subfolders, WAVScribe asks whether to include them.
Alternatively, drag a folder or files from Windows Explorer directly into the file list, or right-click a folder in the folder tree and choose Load folder. See "Loading Files" above for all options.
The file list populates with all discovered WAV files.
2. Select a file
Click a filename in the file list. The metadata panels populate with the file's current metadata, and the waveform loads in the audio player (if visible).
3. Edit a field
Click any metadata field and type a new value. For example, enter a Category, FX Name, or Description.
As soon as any field is modified, the filename in the file list shows the pending changes indicator: a filled circle (●) prefix in amber text. This means the file has unsaved edits that have not yet been written to disk.
4. Embed
Press Ctrl+S to embed metadata into the current file, or click Embed All to embed all of the files at once that have pending changes.
When embedding completes, the pending indicator disappears. The metadata is now permanently written to the WAV file(s) across all supported chunk types simultaneously.
5. Undo (if needed)
If the embed produced an unintended result, press Ctrl+Z immediately to undo. Undo is single-level and in-memory only - it is lost when the application closes or when another embed occurs.
A Note on Workflow
Always embed metadata as the final step in a file's lifecycle, after all audio editing is complete. Some audio editors rewrite WAV files from scratch on export, which can strip embedded metadata. Embedding last ensures the metadata survives in the final delivered file.
Continued in Part 2: Core Editing - conflict detection, Note vs Notes, UCS integration, artwork, custom fields, and the Track Layout editor.
Part 2: Core Editing
The Embed Workflow
Editing metadata in WAVScribe follows a simple pattern: load a file, edit fields, embed.
Embed is WAVScribe's term for writing metadata to disk. When metadata is embedded, WAVScribe writes every editable field to every applicable chunk location inside the WAV file in a single atomic operation. This means BWF/bext, iXML, XMP, LIST/INFO, and ID3 are all updated at once. If the write fails for any reason (permissions, disk full, corrupted file), the original file is left untouched.
Single-File Embed
Select a file, edit any fields, and press Ctrl+S. The file is written immediately. The pending changes indicator (● amber prefix) disappears and the filename returns from amber to its normal color in the file list.
Alternatively, right-click the file and choose Embed Metadata from the context menu.
Batch Embed
To embed multiple files at once, click the checkbox beside each file you want to include, then click Embed All in the toolbar. WAVScribe processes each checked file that has pending changes. When complete, an Embed Complete dialog shows a summary of successes and any failures, with a Copy Report button for saving the results to the clipboard. The report for fully successful batches can be turned off in Preferences; a batch with any failure always shows it.
Files that fail to embed keep their unsaved edits and remain marked in the file list. After resolving the cause of the failure, running Embed All again retries only those files; successfully embedded files are untouched by the retry.
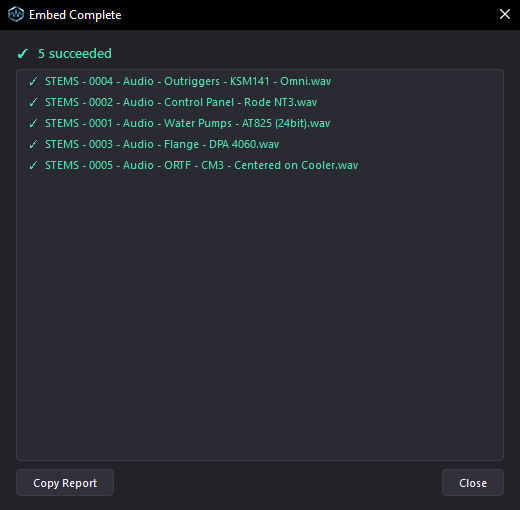
Reading the Results Report
Most batch operations end with a report dialog listing every file processed. The three that share this report are Embed Complete, Wipe Complete, and Undo Complete. (A single-file embed does not show a report - it confirms with a small message in the lower-right corner of the window instead.)
In the report, a green check means the file was written. A red cross means it was not, followed by the reason.
Error messages can be longer than the report window is wide, and the list does not wrap text. There are two ways to read a full message:
- Hover over any row to see its complete text as a tooltip.
- Right-click a row and choose Copy this line to copy that single entry to the clipboard.
The Embed Complete report also has a Copy Report button, which copies the entire run rather than a single line. Use Copy this line when you only need one error out of many. (Copy Report is specific to Embed Complete.)
Cancelling a Batch Operation
Cancelling is not an error - it is a normal way to stop a batch partway, and WAVScribe always stops at a clean boundary. A cancelled operation never leaves a partial file. What happens to the file being processed at the moment you cancel depends on the tool:
- Embed All is the only tool that can stop mid-write. The file being written at that moment is left completely unchanged - WAVScribe writes to a temporary copy and only replaces the original once the write is complete, so a cancelled file never contains a partial write.
- Batch Edit, Find & Replace, Templates, and UCS Batch Rename check for Cancel between files. The file currently being processed finishes normally and keeps its changes; the operation then stops before the next file begins.
- Spreadsheet commits follow the same between-files behavior for metadata writes. Files trading names are renamed as a single transaction: the set always ends up either fully renamed or fully unchanged, never a mixture. If the sequence cannot complete - including if you cancel while it is still in progress - files already moved are returned to their original names. Metadata already written is kept. In rare failure cases, such as a drive going offline mid-rename, a temporary file may be left behind and is reported for manual cleanup.
In every case, files already written keep their changes, and files the operation had not yet reached are untouched on disk. The report that follows tells you exactly what was written and what was not.
Switching Between Files
Editing a file and then clicking a different file in the list does not lose the edits. WAVScribe holds pending changes in memory for every file that has been modified. The pending changes indicator and amber filename remain on each modified file in the list.Clicking back to a previously edited file restores those unsaved edits.
Pending changes exist only in memory. They do not survive closing the application, and discarding a file discards its edits - whether by using Revert to Saved, removing the file from the list, clearing the list, or choosing to drop offline files when a drive disconnects. There is no auto-save.
Field Validation
WAVScribe distinguishes between two kinds of invalid values:
Structural issues block embedding. These are values that would corrupt the WAV file or produce invalid binary data. The user sees a dialog and cannot embed until the value is fixed. Structural blocks include: UMID not being exactly 128 hex characters, non-numeric loudness values, loudness values exceeding the int16 storage range, and loudness sentinel values reserved by the specification.
Nonstandard values are warned but not blocked. These are values that break a format specification but won't corrupt the file. The field shows a red background as a visual warning, and a tooltip explains the expected format. The user can proceed with embedding - the value is written as-is. Nonstandard warnings apply to: Origination Date (not YYYY-MM-DD), Origination Time (not HH:MM:SS), and ISRC (not matching ISO 3901 format).
UCS compliance warnings are a separate toggleable group. Cat ID, Category, and Sub-Category are validated against the UCS v8.2.1 tables. These can be disabled entirely in Preferences under "Highlight UCS non-compliance."
Byte-overflow fields have fixed byte limits set by the BWF specification. When a value exceeds its limit (which can happen via CSV import, paste, or template application - the main panel prevents typing past the limit), WAVScribe truncates at a safe character boundary and shows a summary dialog after embed listing the affected files and fields.
| Field | Byte limit |
|---|---|
| Description | 256 |
| Originator | 32 |
| Originator Ref | 32 |
| Origination Date | 10 |
| Origination Time | 8 |
UMID also has a fixed size - 128 hexadecimal characters - but an invalid length blocks embedding rather than truncating. See the structural validation rules.
Loudness fields - Integrated Loudness, Loudness Range, True Peak, Momentary Max, and Short-Term - must contain valid numeric values. An additional confirmation prompt is shown when editing a loudness field that already contains a value, to guard against accidentally overwriting measured data. See Part 4 for full loudness field details.
Optional pre-embed confirmation: A preference - "Confirm before embedding files with nonstandard values" - is available for workflows that require strict format compliance. When enabled, the embed confirmation dialog includes a summary of any nonstandard values that will be written or truncated. This preference defaults to off.
Conflict Detection
WAV files can store the same logical field in multiple metadata locations. For example, the Description field may exist simultaneously in BWF/bext, XMP, iXML USER, and LIST/INFO - each with a potentially different value. This happens when files pass through different tools that each write to different locations.
When WAVScribe loads a file, it reads all metadata locations and compares them. If two or more locations contain different non-empty values for the same field, that field is flagged as conflicted.
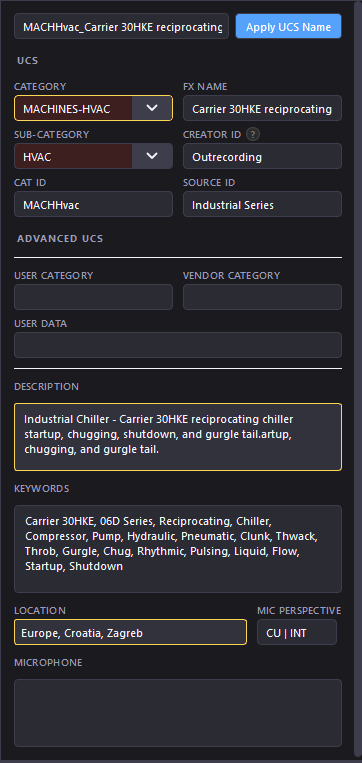
How Conflicts Appear
Conflicted fields are highlighted with an amber border and the cursor changes to a pointer. Hovering over the field shows a tooltip: "Conflict detected - values differ across sources. Click to resolve."
Resolving Conflicts
Clicking a conflicted field opens the Conflict popup. This popup shows every source location that contains a value for that field, along with the actual value stored in each location.
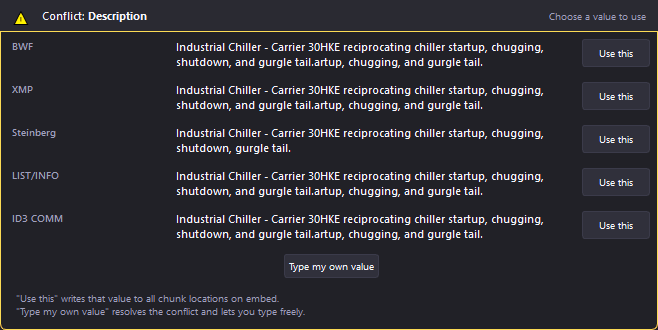
Each source row has a button:
- Use this - Selects that source's value as the resolved value. On the next embed, this value is written to all chunk locations. The conflict is resolved.
At the bottom of the popup:
- Type my own value - Resolves the conflict and places the cursor in the field so a new value can be typed freely. On embed, this new value is written to all locations.
Resolving a conflict does not immediately write to disk - the resolution is staged as a pending edit. On embed, the resolved value is written uniformly to every chunk. If Undo is pressed after embedding, the file reverts to its pre-embed state, including the original per-source divergent values. The conflict highlight returns, and re-opening the popup shows the original sources as they were.
Which Fields Can Have Conflicts
Only fields that are stored in more than one metadata location can have conflicts. A field with a single storage location, such as Originator (which exists only in BWF/bext), can never conflict, because there is only one source to read from.
Conflict-checking covers roughly fifty fields - including all the UCS fields, Description, Keywords, the Creative and Library fields, and most of the Extended section.
Three kinds of difference are deliberately not treated as conflicts, because they occur naturally when different chunk formats store the same information: line-ending differences between chunks; numerically equal ratings ("3" vs "3.0"); and dates that agree but are stored at different precisions.
Date precision deserves explanation: chunk formats impose different date precision by specification - a bext Origination Date is always a full date, ID3's year field is only a year, XMP allows any precision - so a single tool writing a single date across several chunks unavoidably produces different precisions. WAVScribe treats "2023" and "2023-05-01" as the same date stored two ways. Dates that actually disagree - "2023-05-01" vs "2023-06-14", or "2023" vs "2024" - are always flagged as conflicts.
Disabling Conflict Detection
Conflict detection can be turned off in Preferences under "Highlight metadata conflicts on file load." When disabled, WAVScribe still reads from all locations using its priority order, but no amber highlighting is shown and no conflict popup is available. The first non-empty value found wins silently.
Note vs Notes
These are two separate fields that appear near each other in the Production / iXML section of the Master Column. They serve different purposes and editing one does not affect the other.
Note - A production-time note, typically written during recording. It is stored in a single location: the iXML <NOTE> element. This is the field a recordist uses on set or in the field to flag a take ("good take," "airplane overhead," "room tone").
Notes - An editorial or library note. It is read from several locations across iXML USER, XMP, ASWG, and ID3 (TIT3), in priority order. When embedded, the value is written back to all of these locations. This is the field a sound library editor uses to describe a sound after the fact.
Both fields have a tooltip (question mark icon) in the UI that explains the distinction.
In short: Note is what was written during capture. Notes is what was written during cataloging. They are intentionally independent.

UCS Integration
WAVScribe includes full support for the Universal Category System (UCS) v8.2.1, but does not require its use. All UCS-related fields accept freeform text. Users who do not use UCS can type any value they wish into Category, Sub-Category, Cat ID, and FX Name without restriction.
Category and Sub-Category
The Category dropdown contains all 82 UCS v8.2.1 categories. Typing into the field filters the list. Selecting a Category from the list updates the Sub-Category dropdown to show only subcategories valid for that category.
Smart Sub-Category clearing: When the Category is changed, Sub-Category is cleared only if the previous Sub-Category value was a valid UCS entry for the previous Category. If the Sub-Category contained freeform text (a non-UCS value), it is preserved. This prevents losing custom values when browsing categories.
Both fields are editable - any text can be typed directly, bypassing the dropdowns entirely.
Cat ID
Cat ID auto-populates when both Category and Sub-Category are valid UCS values. The format follows the UCS specification (mixed case, no hyphen - e.g., "AIRBlow", "DRWRPlas", "DSGNDron"). Cat ID can also be typed manually.
FX Name
FX Name is a freeform text field. Spaces are preserved per the UCS specification. This field describes the specific sound (e.g., "Heavy Metal Door Slam", "Rain on Tin Roof Light").
Creator ID and Designer
The Creator ID field in the UCS section and the Designer / Creator ID field in the Creative section are the same underlying field. Editing either one immediately updates the other. The dual labeling reflects different conventions: "Creator ID" is the UCS term, while "Designer" is the broader industry term used in metadata standards.
Apply UCS Name
The Apply UCS Name button (visible at the top of the center panel next to the filename field) renames the file on disk using the assembled UCS filename structure:
CatID(-UserCategory)_(VendorCategory-)FXName_CreatorID_SourceID(_UserData).wav
The four mandatory components are Cat ID, FX Name, Creator ID, and Source ID. If any are missing, the rename is blocked with a message listing the missing fields. Cat ID must also be a valid UCS identifier.
The filename field can be edited manually before clicking Apply UCS Name. Although the field assembles a UCS-formatted name by default, any text you type by hand is used as-is - so you can rename the file to anything you like, not only a UCS name. Whatever appears in the field is what the filename becomes.
A confirmation dialog is shown before any file is renamed on disk.
Fill from Name
Fill from Name is the inverse of Apply UCS Name. It sits directly below Apply UCS Name, right-aligned in the row that holds the UCS section header. Where Apply UCS Name builds a filename from the UCS fields, Fill from Name reads the file's current on-disk name and, when that name is a valid UCS name, fills the UCS fields from it. Nothing is written to disk - the fill changes only the panel, and the file is saved when you embed as usual.
The name is read against the same UCS structure that Apply UCS Name builds:
CatID(-UserCategory)_(VendorCategory-)FXName_CreatorID_SourceID(_UserData)
The four required blocks - Cat ID, FX Name, Creator ID, and Source ID - are separated by underscores. The three optional blocks are read when the name carries them: User Category (after a hyphen inside the first block), Vendor Category (before a hyphen inside the second block), and User Data (a fifth underscore-separated block). Only the first four underscores are structural; any underscores after that are kept as ordinary text inside User Data. Two reading rules are worth knowing. The hyphen in the first block splits off a User Category only when the part before it is an exact Cat ID from the UCS list, matching capitalization. In the second block, the first hyphen splits off a Vendor Category, and any later hyphens are treated as ordinary text within the FX Name.
A fill is an exact projection of the name: optional blocks the name does not carry have their fields cleared, so the panel ends up matching the name exactly. If the fill would overwrite fields that already hold values, a confirmation appears first, stating how many field values would change, with a Don't show this message again checkbox.
Button states. Fill from Name is lit (accent blue) only when the on-disk name parses as a UCS name and filling would change at least one field. Otherwise it is greyed out, and its tooltip says which case applies: "Filename is not a valid UCS name" when the name does not parse, or "Fields already match this file's name" when a fill would change nothing. Because of the second case, the button goes dark right after a successful fill and lights again as soon as any UCS field is edited away from the name.
Fill from Name reads a name and never renames a file; Apply UCS Name and UCS Batch Rename build names from the fields and never read a name. In this version, Fill from Name works on the single current file.
Artwork
WAVScribe supports embedding PNG and JPEG album art into WAV files, up to approximately 64 megapixels. Image format is verified by file content rather than by file extension. Artwork is stored in the ID3 chunk.
Importing Artwork
There are two ways to import artwork to the currently loaded file from the main editor:
- Click the Import button in the Artwork section of the Master Column and select an image file.
- Drag and drop an image file directly onto the artwork display area.
The image appears immediately in the artwork preview. Importing artwork marks the file as having pending changes.
Artwork can also be set across multiple files at once through Batch Edit and Templates - see Part 3.
Clearing Artwork
Click the Clear button to remove the artwork. The file must be embedded afterward for the removal to take effect on disk.
Technical Details
WAVScribe reads artwork from both uppercase ID3 and legacy lowercase id3 chunks (uppercase takes priority). On write, WAVScribe consolidates all ID3 data into a single uppercase ID3 chunk placed after the audio data - the placement other tools expect. Files that arrive with duplicate or legacy lowercase ID3 chunks are cleaned up automatically on the first save.

Undo
WAVScribe provides a single-level undo for embedded operations. After embedding one or more files (whether via Ctrl+S or Embed All), the previous state can be restored by pressing Ctrl+Z.
Important characteristics:
- Undo is single-level - only the most recent embed can be undone. Embedding again overwrites the undo state.
- Undo is in-memory only - it is lost when the application is closed.
- Undo restores exactly what was on disk before the last embed. If the prior values included non-standard formatting or values from other tools that don't meet strict format specifications, those values are restored as-is. Undo does not "correct" pre-existing data - it faithfully restores the previous state, including any per-source divergent values for fields that had conflicts before the embed. The one exception is a small set of writer-bookkeeping values - the software-identifier and timestamp fields WAVScribe stamps to record that it wrote the file (LIST/INFO ISFT, xmp:CreatorTool, xmp:MetadataDate, xmp:ModifyDate, and ID3 TSSE). These are written fresh on every save, including an undo, so any third-party values previously in those specific fields are not restored. No user-entered metadata is affected.
Undo works for both single-file embeds and batch embeds. When undoing a batch embed, all files from that batch are reverted.
Copy and Paste Metadata
Metadata field values can be copied from one file and pasted to one or more other files.
To copy: Right-click a single file in the file list and choose Copy Metadata. This copies all editable field values from that file to an internal clipboard.
To paste: Highlight one or more target files (using click, Shift+click, or Ctrl+click), then right-click and choose Paste Metadata (N files). A dialog asks how to apply the copied values, with two options: Overwrite All Fields replaces every field in the target files with the copied values, while Fill Empty Fields Only applies copied values only where a target field is currently empty, leaving existing values untouched. Choose one (or Cancel to abort). The pasted files are marked with pending changes and must be embedded to write the changes to disk.
Undo Last Embed (Ctrl+Z) does not reverse a paste - it only reverses the most recent embed. To back out an unembedded paste, either use Revert to Saved on the affected files (which reloads their metadata from disk and clears all pending changes), remove the files from the list and reload them, or edit the fields back by hand.
Quick View Card
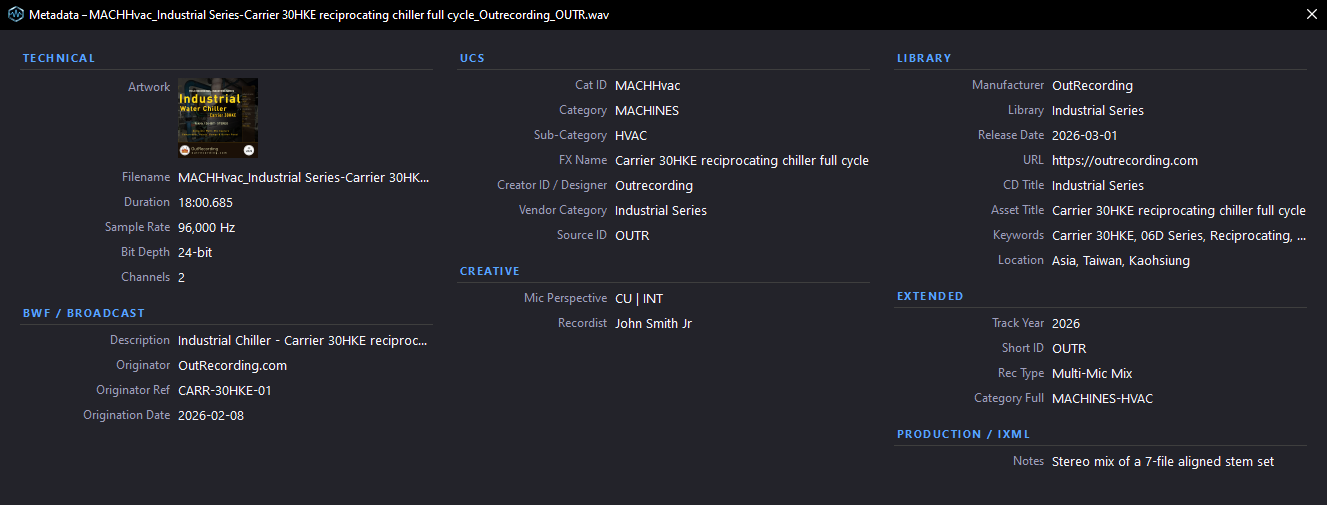
Press Ctrl+Space to open the Quick View Card for the currently selected file. This is a read-only popup that shows all populated metadata fields in a compact, multi-column layout organized by section.
The Technical section (filename, duration, sample rate, bit depth, channels) is always visible. All other sections show only fields that contain data - empty fields are hidden. Custom fields appear in their own section if any are populated.
The Quick View Card is useful for getting a quick overview of what metadata a file contains without scrolling through the editing panels. It can be moved and resized by dragging its edges - expanding the window opens up values that were truncated to fit. For very long values that still do not fit, hover over the value to see it in full as a tooltip. The card is dismissed by pressing Escape or clicking the X button.
The Quick View Card always shows the values currently stored in the file as WAVScribe last read or wrote them. If the file has unsaved edits in the editor, the card displays a banner and continues to show the on-disk values - making it a quick way to compare your pending changes against what the file actually contains. The main editing panel shows your working state; the card shows the file.
Extended Metadata Dialog
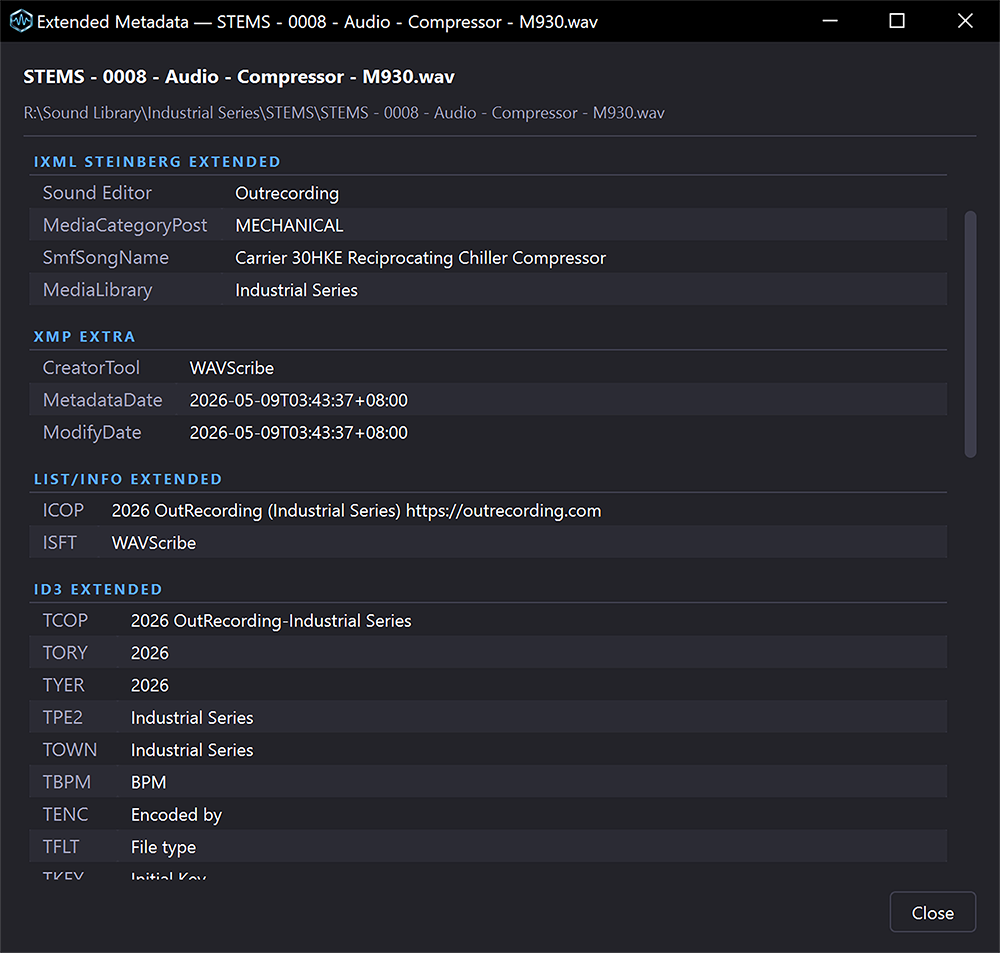
Press Ctrl+I to open the Extended Metadata dialog. This is a read-only window that shows metadata fields that are not displayed in the main editing UI.
The purpose of this dialog is transparency. Together with the main editor, it shows the metadata WAVScribe reads that can be displayed as readable text - including fields written by other tools that WAVScribe preserves but does not manage, vendor extensions, and unrecognized keys, frames, or chunks. A few things are preserved but not shown: content that is not human-readable, and structured binary chunks WAVScribe does not parse (shown as raw text fragments rather than decoded fields). Very long values are shortened for display. Whether shown here or not, nothing WAVScribe preserves is ever modified or removed on embed.
The dialog is organized into sections based on chunk type:
- BWF Extended - BWF version and other bext fields not in the main UI
- iXML USER (Unknown) - iXML USER keys that are not mapped to any WAVScribe field. These are typically written by other tools.
- iXML Steinberg Extended - Steinberg-specific attributes from the iXML Steinberg extension
- XMP Extra - XMP fields from namespaces not managed by WAVScribe
- LIST/INFO Extended - LIST/INFO subchunk keys not mapped to WAVScribe fields
- ID3 Extended - ID3 text frames not managed by WAVScribe
- Other Chunks - Any non-standard chunks present in the file (e.g., axml)
- Cross-Chunk iXML Divergence - Appears only on files that contain multiple iXML chunks with conflicting values. See below.
Only sections with at least one populated field are shown.
Cross-Chunk iXML Divergence
Some WAV files contain more than one iXML chunk - a pattern occasionally produced by tools that write metadata to different positions within the file. When this happens, WAVScribe merges the chunks into a single view on read, with the post-data chunk's values taking precedence when both positions contain data for the same field. Values from the secondary chunk that differ are preserved internally but not shown in the main editing panels.
The Cross-Chunk iXML Divergence section surfaces these differences so they are visible before the file is saved. Each entry shows the field name and both chunk values side by side, with labels indicating the source location (iXML, iXML USER, ASWG, or Steinberg).
This section is informational. Most files do not have multiple iXML chunks, so most users will never see it. When it does appear, it means the file arrived with an unusual internal structure from another tool.
Behavior on embed: When a file with multiple iXML chunks is embedded, WAVScribe consolidates all iXML data into a single chunk. After saving, the file has exactly one iXML chunk and the divergence display will no longer appear on subsequent loads. The values shown in the main UI are what get written - the post-data chunk's values take precedence during the initial read when both positions contain data.
This is a one-time normalization. Once WAVScribe has saved a file, its iXML structure is clean and consistent.
The dialog is modeless - the main window remains interactive while it is open. When a different file is selected in the main window, the Extended Metadata dialog automatically refreshes to show that file's data.
User Defined Area and Field Pinning
The User Defined Area (left side of the center panel) is a customizable workspace where frequently used fields can be arranged for quick access.
Pinning and Unpinning Fields
You can add fields to and remove fields from the User Defined Area in three ways:
From the Master Column: Right-click a field to open a menu with a Pin to User Defined Area (or Unpin from User Defined Area) option. As a fast path, Ctrl+click the field to toggle its pinned state directly. A small accent-colored dot next to the field label marks it as pinned.
From the Add / Remove window: Click the Add Field button at the bottom of the User Defined Area to open the Add / Remove User Defined Fields window. The window lists every available field, organized by section (BWF / Broadcast, Creative, Library, Production / iXML, and so on). A field that is not yet in the User Defined Area appears in normal text; click it to add it right away. A field already in the area appears in the accent color with a leading check mark; click it to remove it. There is no confirmation either way, and clicking the same entry again reverses it. The User Defined Area updates live behind the window as you work. Any custom fields you have created appear in their own Custom Fields section at the foot of the window, shown only when at least one custom field exists, and behave the same way. Removing a custom field here only takes it out of the User Defined Area; its definition is left untouched in the Custom Fields manager, which is still the only place a definition is deleted.
By hovering in the panel: Hover over a pinned field's top-right corner in the User Defined panel to reveal a red X button that, when clicked, removes the field.
Reordering Pinned Fields
To change the order or column assignment of pinned fields, click the Reorder button at the bottom of the User Defined area. This opens the Reorder Fields dialog.
The dialog displays two columns matching the User Defined area's layout. Each pinned field appears as a row showing its label. Text-type fields that occupy extra height in the panel (such as Notes, Note, and UMID) appear proportionally taller in the dialog.
Drag a field up or down within a column to change its position. Drag a field from one column to the other to move it across columns. If all fields are moved into a single column, the empty column is hidden in the panel - this is a valid layout.
Click OK to apply the new arrangement. Click Cancel (or the close button) to discard changes - the panel remains as it was. The main window is not accessible while the dialog is open.
Fields cannot be edited inside the Reorder Fields dialog - it is for arrangement only. Field values are edited in the main panel as usual.
UDA Profiles
The Profiles button at the bottom of the User Defined Area opens the UDA Profiles dialog. Profiles allow saving, loading, importing, and exporting User Defined Area configurations. This is useful for switching between different workspace layouts - for example, one profile for field recording work and another for sound library cataloging.
Custom Fields
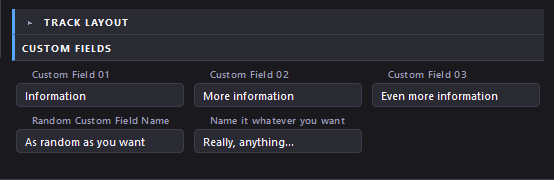
Custom fields are user-defined metadata fields stored in the iXML USER block. They appear in the Custom Fields section at the bottom of the Master Column (the section appears once the first custom field is created), below the Track Layout editor.
Creating Custom Fields
Open the Custom Fields manager from the toolbar (Custom Fields button or Ctrl+Shift+B). Enter a display name for the new field and click Add. The field is immediately available in the editing UI.
Custom fields can optionally be pinned to the User Defined Area at creation time.
How Custom Fields Are Stored
Custom field values are written to the iXML USER block inside the WAV file, using a key derived from the field's display name. The data is stored in a standard, portable location, and it survives WAVScribe's own spreadsheet round-trips.
Whether another application displays a custom field is a separate matter. The value is genuinely in the file, but most tools read only a fixed set of known keys and ignore the rest - so a custom key you define will usually be overlooked unless the other tool is built to surface arbitrary iXML USER keys. The data is preserved and available; being read depends on the receiving tool.
Removing Custom Fields
Removing a custom field from the UI does not delete any data already embedded in files. The data remains in the iXML USER block. WAVScribe simply stops displaying a widget for that key. If the field is added again later with the same name, the existing data reappears.
Track Layout Editor
The Track Layout editor appears in the Master Column as a collapsible section labeled TRACK LAYOUT. Click the section header to expand or collapse it.
When expanded, the Track Layout editor displays a table with one row per track:
| Column | Description |
|---|---|
| # | Track number (read-only, sequential) |
| Name | Editable track name (e.g., "Track 1", "Boom", "Lav 1") |
| Intlv | Interleave index - the track's position in the interleaved audio data |
| Function | The track's role (e.g., LEFT, RIGHT, CENTER, LFE, LEFT SURROUND, RIGHT SURROUND) |
Why Track Layout Does Not Auto-Populate
When a file is loaded, the Track Layout editor does not automatically populate from the file's channel count. This is deliberate. WAVScribe follows a "do no harm" principle: it never writes data to a file without explicit user action. Auto-populating track layout data on load could overwrite existing track assignments that were set by a recorder or DAW.
The Auto Button
Click Auto to populate the Track Layout from the file's channel count. This creates one row per channel with generic names ("Track 1", "Track 2", etc.) and sequential interleave indices. Function values are populated for common channel configurations (mono, stereo, 5.1 surround) but left empty for non-standard channel counts.
Auto is a starting point - all values can be edited afterward.
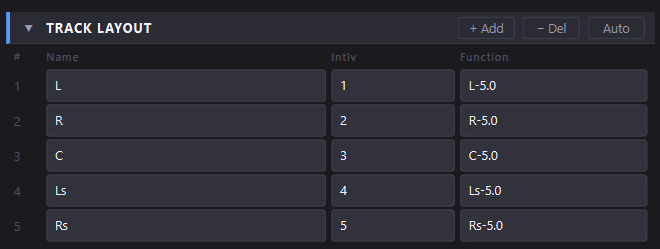
Adding and Removing Tracks
- + Add - Adds a new empty track row at the bottom. Maximum 128 tracks.
- − Del - Removes the last track row.
Track Layout changes are part of the file's pending edits and must be embedded to be written to disk.
Continued in Part 3: Batch Operations - Batch Edit, Find & Replace, Templates, UCS Batch Rename, and Spreadsheet round-trip.
Part 3: Batch Operations
WAVScribe provides several tools for editing metadata across multiple files at once. Most batch tools operate on checked files - files whose checkboxes are checked in the file list. The exception is the Spreadsheet tool, which can operate on all files in the list, only the checked files, or a folder scanned independently.
All five batch operations - Batch Edit, Templates, Find & Replace, Spreadsheet, and UCS Batch Rename - require that no files in the list have unsaved edits. If any files have pending changes, WAVScribe shows a warning dialog listing them (up to 10 filenames) and asks the user to embed or revert before proceeding. This prevents accidental data loss: batch operations read each file from disk, so unsaved in-memory edits would be silently overwritten if the operation were allowed to run.
The Preview Dialog
Batch Edit and Templates share the same Preview dialog. It provides a detailed, read-only view of every change that will be applied before committing.
Opening Preview
In Batch Edit, click Preview Changes…. In Templates, select a template and click Preview Apply…. The dialog opens showing all checked files and every field that will be modified.
Layout
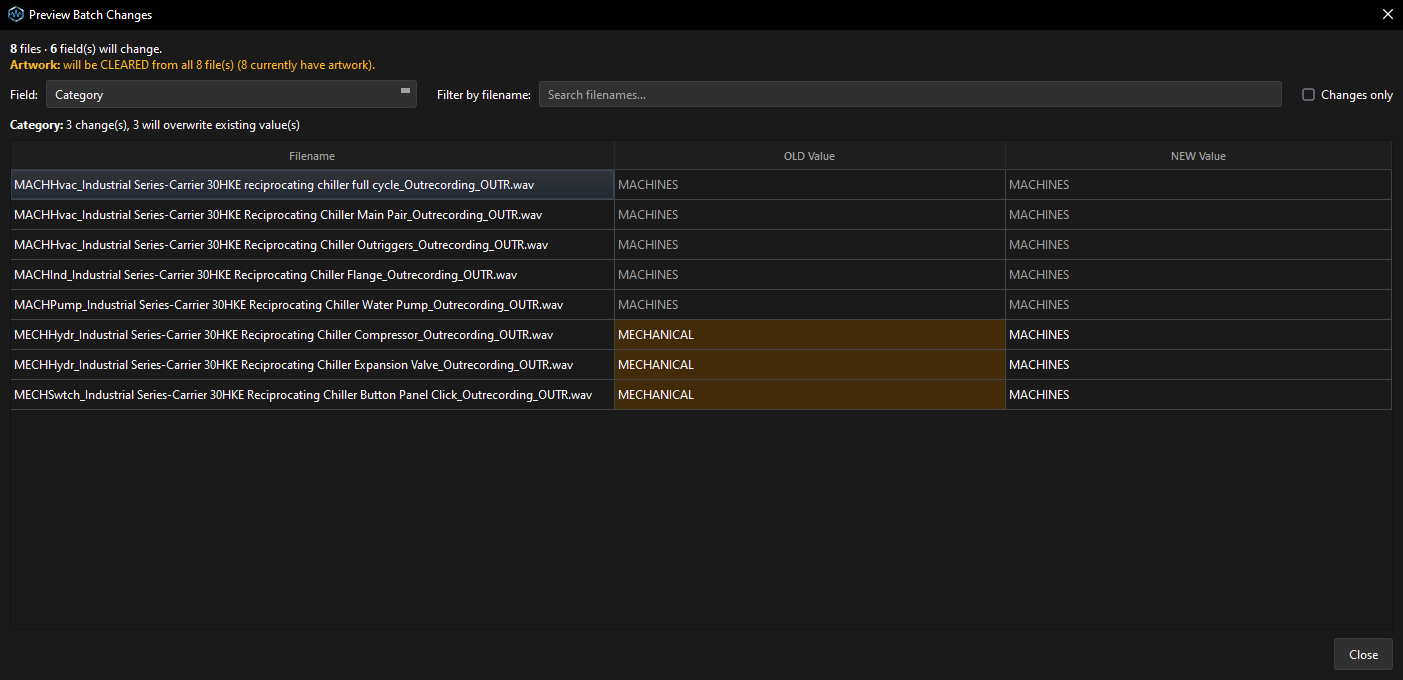
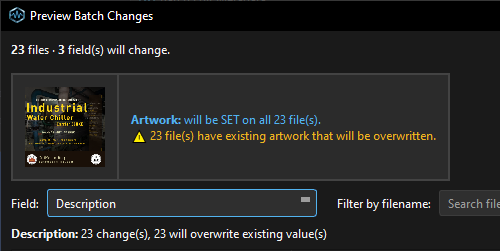
The top row contains three controls. On the left, a field dropdown lists every field included in the operation - select a field to see its before-and-after values across all files. The dropdown supports type-to-search filtering (case-insensitive, matches anywhere in the field name). To the right of the dropdown, a Filter by filename search bar narrows the visible rows by filename (live, case-insensitive). On the far right, a Changes only checkbox hides rows where the value will not actually change - useful in large file lists or when using Templates in fill-empty mode where most files may already have the correct value.
Switching fields in the dropdown preserves row positions, so the user can compare values across fields without losing their place. The filename filter and "Changes only" checkbox compose together - both filters apply simultaneously. The "Changes only" state persists across field switches within the same Preview session.
Below the controls, a summary line reads: "FieldName: N change(s), M will overwrite existing value(s)." N is the total number of files where the value will change; M is the subset where an existing non-empty value will be replaced. These counts always reflect the full dataset, not the filtered view.
The Table
The table has three columns: Filename, OLD Value, and NEW Value. Word wrap is enabled.
Rows where the old and new values are identical (no change for that file) appear in muted color. Rows where an existing non-empty value will be overwritten show a subtle dark-amber tint on the OLD cell as a visual warning.
Artwork
When the operation includes artwork changes, a card appears in the header area showing the artwork thumbnail (80×80) and a description of the action - for example, "Artwork: will be SET on all N file(s)" or "Artwork: will be CLEARED from all N file(s) (M currently have artwork)." If setting artwork would overwrite existing artwork on some files, an amber warning line notes the conflict.
Batch Edit
Toolbar: Batch Edit | Shortcut: Ctrl+Shift+E | Requires: At least 2 checked files
Batch Edit applies a single value to one or more fields across all checked files simultaneously.
Layout
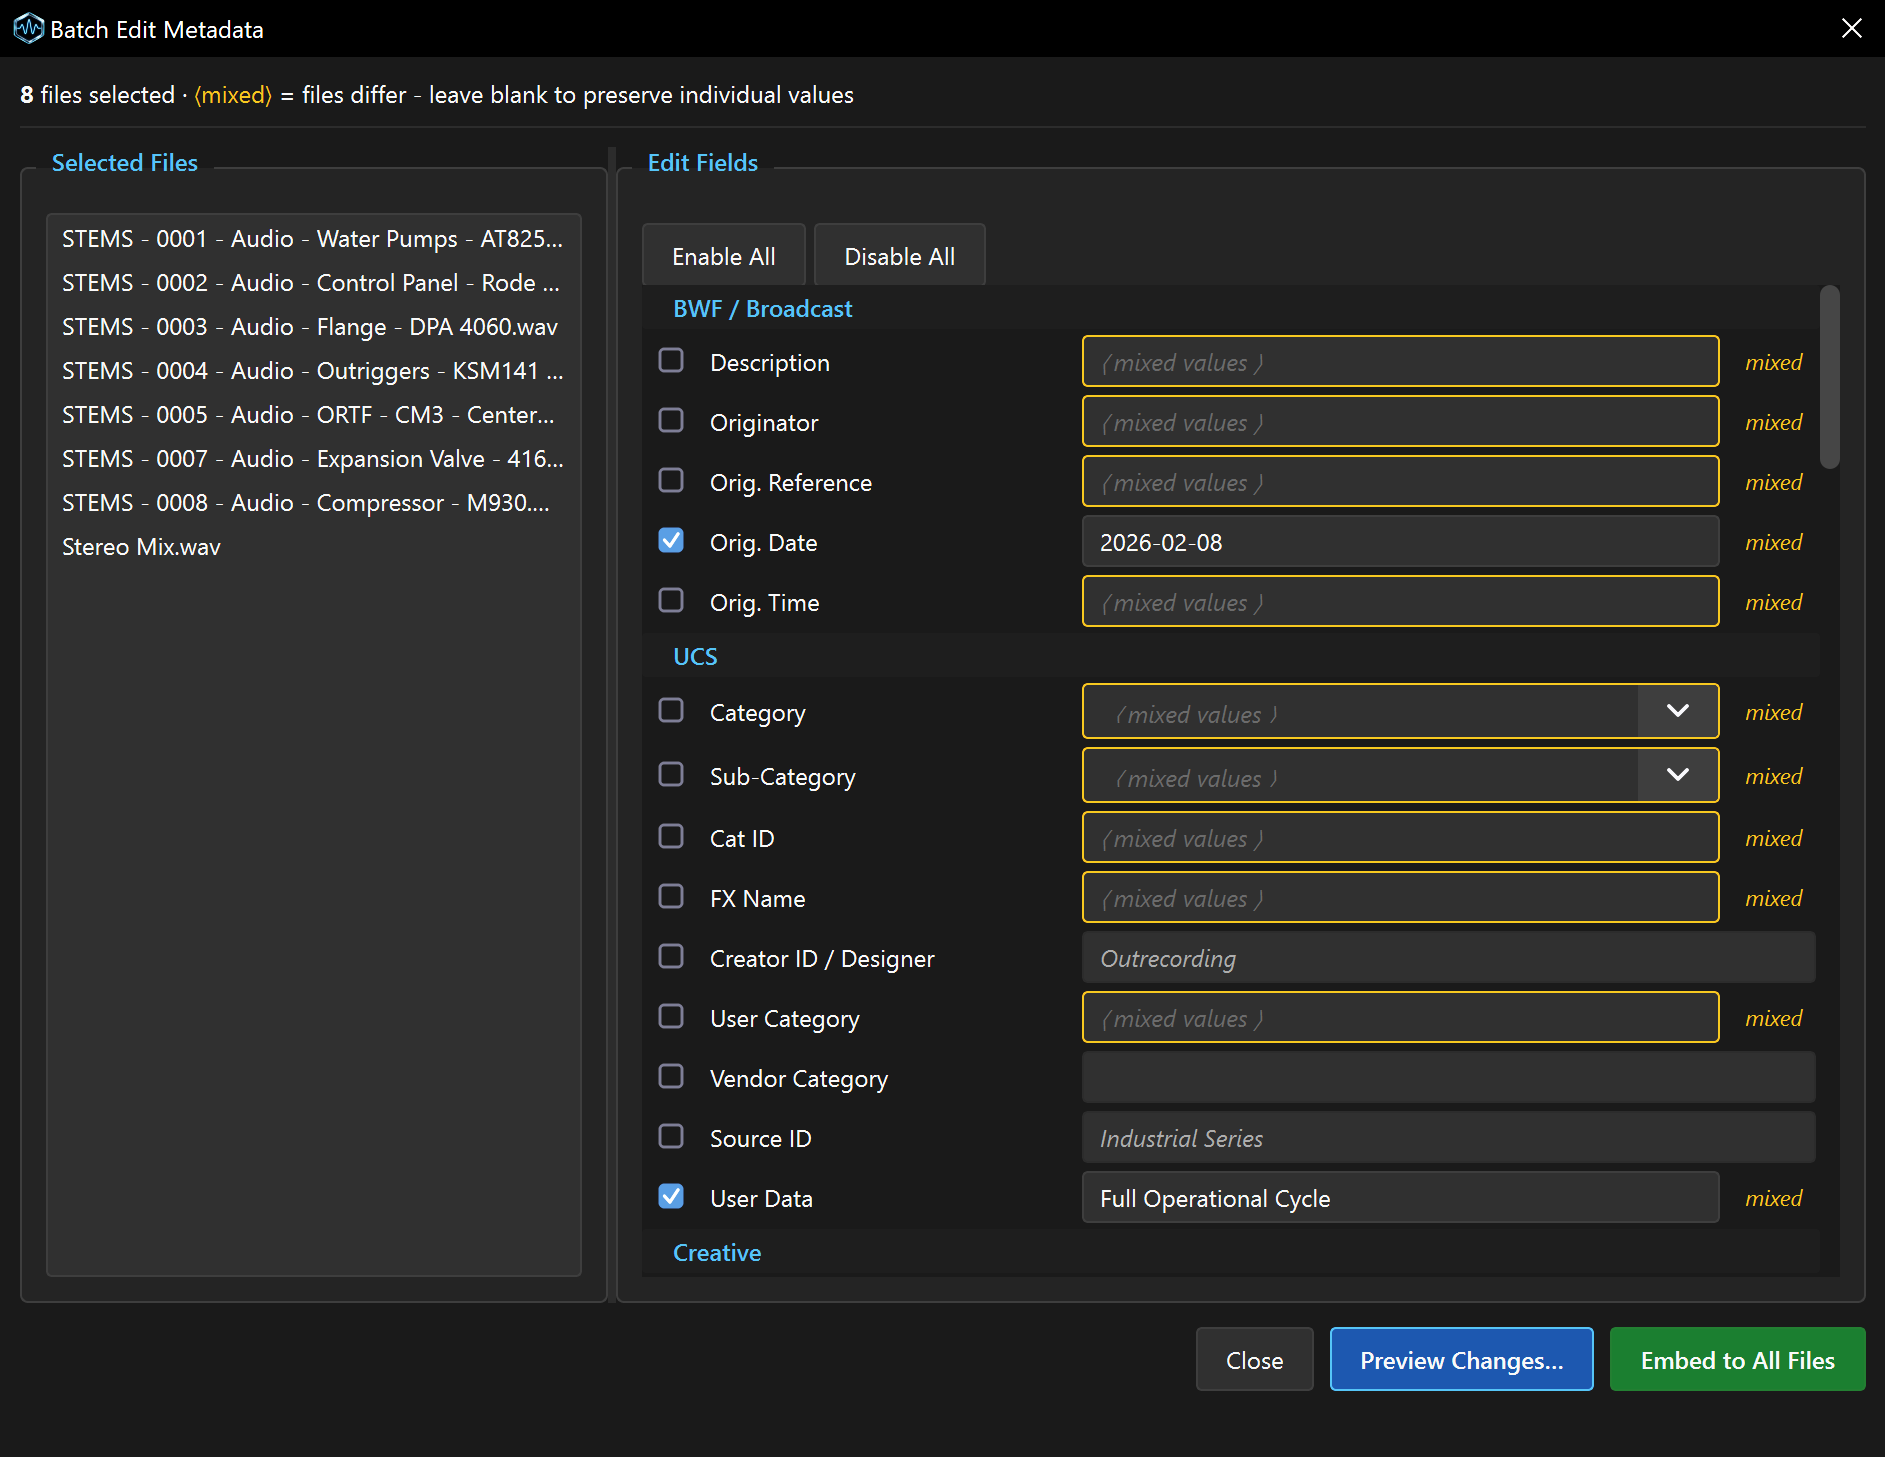
The dialog is split into two panels. The left panel lists the selected files. The right panel lists every editable metadata field, organized by section (UCS, Creative, Library, Production / iXML, etc.), each with a checkbox and a text field.
UCS Category Fields
The Category and Sub-Category rows are dropdowns that work like the ones in the main editing panel. Pick from the full UCS v8.2.1 list or type your own value - free text is always allowed, and these fields are never locked to UCS. Typing filters the list, matching anywhere in a name rather than only at the start. Choosing a Category repopulates the Sub-Category dropdown with that Category's sub-categories, and any text you have already typed is kept through the change.
When the Category and Sub-Category form a valid UCS pair, Cat ID fills in automatically and its checkbox is armed for you. Like any armed row, one click unarms it: the value stays visible but greyed out, and unarmed rows are not applied to the batch.
Mixed Values
When the selected files have different values for a field, the field displays an amber italic placeholder: ⟨ mixed values ⟩. This indicates that the files disagree on this field. Leaving a mixed-value field unarmed (checkbox unchecked) preserves each file's individual value.
Agreed Values
When every selected file already holds the same value for a field, that shared value is shown in grey, unarmed text - there is no highlight, because there is nothing to reconcile. Arming the field (checking its checkbox) turns the text white and makes it editable. Embedding with the value unchanged simply rewrites the same value the files already had, so the files keep it. To actually change a shared value across the batch, arm the field and type the new value.
Arming Fields
To include a field in the batch update, check its checkbox. The field becomes editable. Type the desired value.
Enable All and Disable All buttons at the top of the field list control all checkboxes at once.
Clearing Fields
Arming a field and leaving it empty clears that field across all selected files. This is the intended way to bulk-clear a field - for example, to remove all Keywords from a batch of files, arm the Keywords field and leave the text box empty.
Preview and Confirmation
Preview Changes… opens the Preview dialog described above, showing exactly what will change for each file - field by field, before vs. after.
Embed to All Files commits the changes. Before writing, a confirmation dialog summarizes the operation: how many fields will be written to how many files. If any fields are being cleared, the dialog explicitly lists them (up to 8 field names; more than 8 shows a count) and changes the default button to Cancel as a safety measure.
Artwork
An Artwork section at the bottom of the Batch Edit dialog allows setting or clearing cover art across all selected files in one operation.
To set artwork, drag an image file anywhere into the Batch Edit dialog - the image appears in the preview pane and the artwork checkbox enables automatically. Alternatively, click Import… to choose an image via file picker. Supported formats: PNG and JPEG.
To clear artwork from all files, check the artwork checkbox without importing an image. The preview shows an amber warning: "Artwork will be CLEARED from all files." Drop an image to switch from clearing to setting.
Unchecking the artwork checkbox excludes artwork from the batch operation entirely - no artwork changes are made.
The confirmation dialog includes the artwork action when one is queued: file count and image size for a set operation, or a clear warning with Cancel as the default button for safety.
Validation
Values that would corrupt the bext chunk are caught upfront, before any files are written: text exceeding the BWF byte limits - Description (256 bytes), Originator (32 bytes), Originator Reference (32 bytes), Origination Date (10 bytes), Origination Time (8 bytes). A single dialog lists the offending fields and blocks the operation until they are corrected. This matters most for multi-byte text (Chinese, Japanese, accented characters), where a value well under the character count can still exceed the byte limit. Format conventions - such as date layout - produce warnings, not blocks.
Find & Replace
Toolbar: Find/Replace | Shortcut: Ctrl+H | Requires: At least 1 checked file
Find & Replace searches for text within a specific field across checked files and replaces matches.
Layout
The dialog has two sections. The Pattern section at the top contains the field selector, search options, and the Find/Replace text fields. The Preview section below shows a live preview of all matches and their results as the pattern is typed.
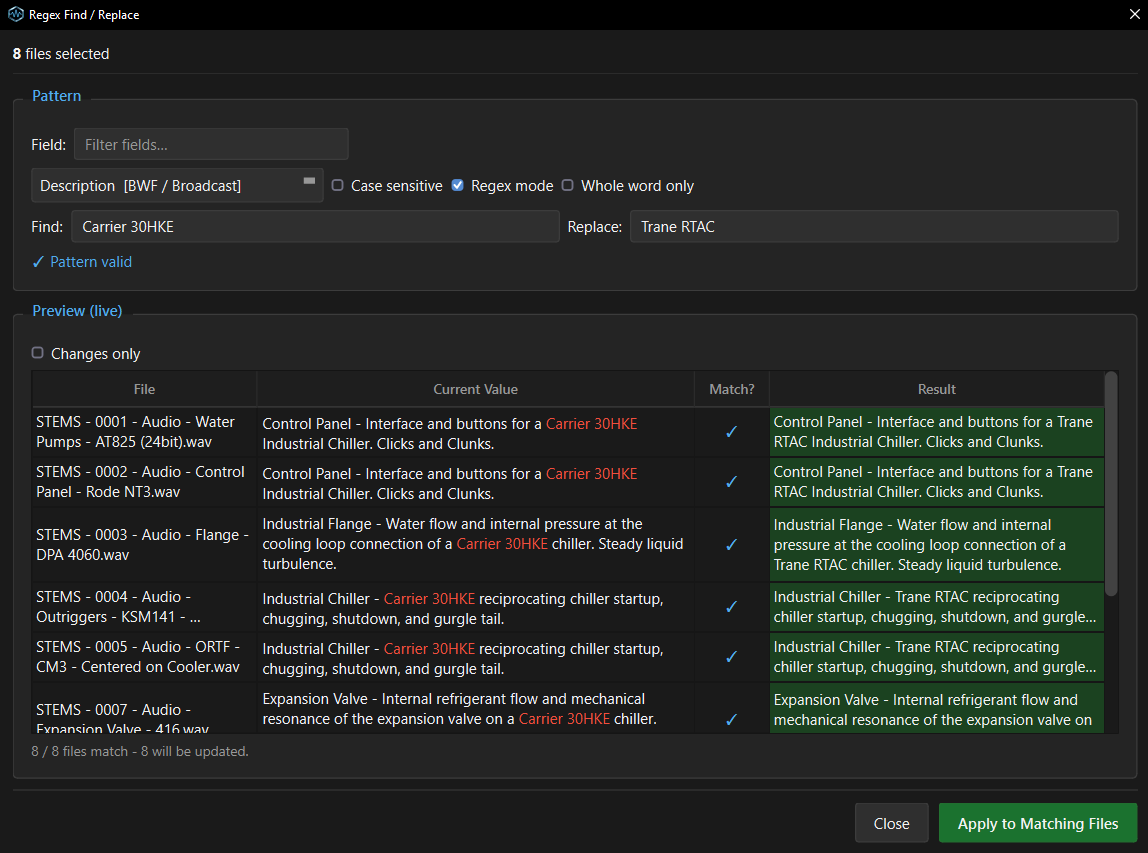
Field Selector
The Field dropdown selects which metadata field to search. A filter box above the dropdown allows typing to narrow the field list. The selected field name includes its section in brackets (e.g., "Recordist [Creative]").
Search Options
Three checkboxes control matching behavior:
- Case sensitive - When checked, "Cat" does not match "cat".
- Regex mode - When checked, the Find pattern is interpreted as a regular expression. A "Pattern valid" indicator confirms the regex is syntactically correct.
- Whole word only - When checked, matches must be bounded by word boundaries. "Cat" does not match "Category".
Live Preview
The preview table updates in real time as the Find and Replace values are typed. Each row shows a file name, its current value for the selected field, whether it matches (✓ or –), and the result after replacement. The status bar shows a summary: "1 / 2 files match - 1 will be updated."
A Changes only checkbox filters the preview to show only files where the replacement would produce a different value. This is purely a viewing aid - it does not change which files are modified when Apply is clicked. On large file lists, it makes it easier to confirm the scope of the operation at a glance.
Applying Changes
Click Apply to Matching Files to write the replacements. A confirmation dialog summarizes the operation - for example, "Write changes to 3 file(s)? Field: Description Pattern: 'apple' Replace: 'orange'". Click Yes to proceed or No to cancel. The changes are written to disk immediately. When the operation completes, a dialog confirms how many files were updated.
Templates
Toolbar: Templates | Shortcut: Ctrl+Shift+T
Templates allow saving all current metadata field values as a named configuration, then applying that configuration to other files.
Layout
The dialog is split into two panels. The left panel lists saved templates. The right panel shows the selected template's contents as a Field / Value table.
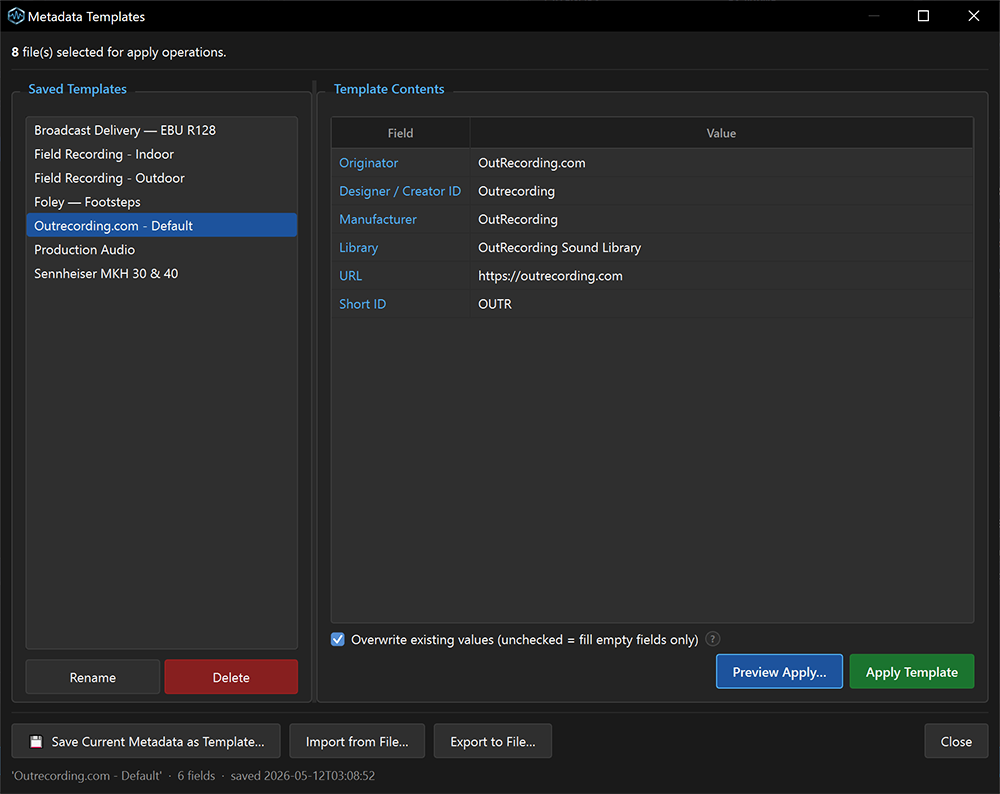
Saving a Template
Click Save Current Metadata as Template… at the bottom of the dialog. All field values from the currently loaded file in the main window are captured into a named template. Templates are stored in the configuration directory at %LOCALAPPDATA%\WAVScribe\templates\.
If the source metadata contains nonstandard values (e.g., a date not in YYYY-MM-DD format), a dialog appears listing them and explaining that they will be preserved as-is but may not be recognized by some third-party tools. The user can proceed with saving or cancel.
Applying a Template
Select a template from the list and click Apply Template. The template's values are applied to all checked files.
The Overwrite existing values checkbox controls how the template interacts with existing data:
- Checked (default) - The template overwrites all fields, including fields that already have values.
- Unchecked - The template only fills fields that are currently empty. Existing values are preserved.
Templates do not affect UMID, ISRC, or Loudness fields regardless of overwrite mode. These structural fields are excluded because they contain measured or system-generated values that should not be overwritten by a descriptive metadata template.
Preview Apply… opens the Preview dialog described at the top of this chapter, showing what will change before committing.
Field Value Validation
Both Preview Apply… and Apply Template check the template's values against BWF byte-length limits before proceeding. If any value exceeds its limit - Description (256 bytes), Originator (32 bytes), Originator Reference (32 bytes), Origination Date (10 bytes), Origination Time (8 bytes) - a dialog lists the offending fields and blocks the operation until the values are corrected in the template editor. This is especially relevant for multi-byte text (Chinese, Japanese, accented characters, etc.) where a string well under the character limit can still exceed the byte limit.
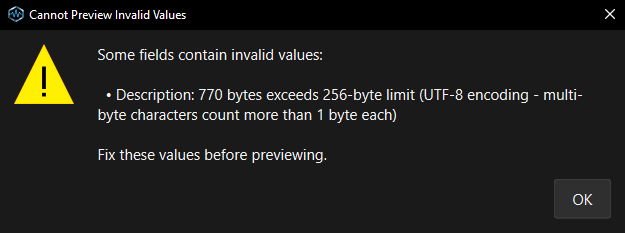
Editing a Saved Template
Saved templates can be edited directly in the Templates dialog without applying them to a file first.
Select a template from the list. The right-hand preview table shows the template's fields and values. Double-click any value in the Value column to edit it in place. The Field column (left) is not editable.
The Rating field uses a star widget. Click a star to set the rating (1–5). Click the currently active star to clear the rating back to unset.
The Artwork row appears for every template, including templates without artwork. It shows a thumbnail preview with Import… and Clear buttons. Click Import… to choose an image, or drag an image file anywhere onto the Templates dialog to add it to the currently selected template. Click Clear to remove the artwork. Artwork changes enable the Save Changes button like any other edit.
When any field has been changed from its saved value, the modified row is highlighted with a dark amber background. Two buttons appear at the bottom of the preview pane:
- Save Changes - Writes the edits back to the template file on disk. If any edited values are nonstandard (date/time format, etc.), the same warning dialog described under Saving a Template appears first.
- Revert - Discards all edits and reloads the template from disk.
If a different template is selected or the dialog is closed while edits are pending, a confirmation prompt asks whether to discard the unsaved changes.
Clearing a field value entirely (deleting all text) removes that field from the template. Setting the rating to 0/unset removes the rating field. This matches how empty values are handled when saving a new template - only fields with values are stored.
Note: Only fields already present in the saved template can be edited through this surface. To add a field that isn't in the template, apply the template to a file, edit the field in the main window, and save as a new template.
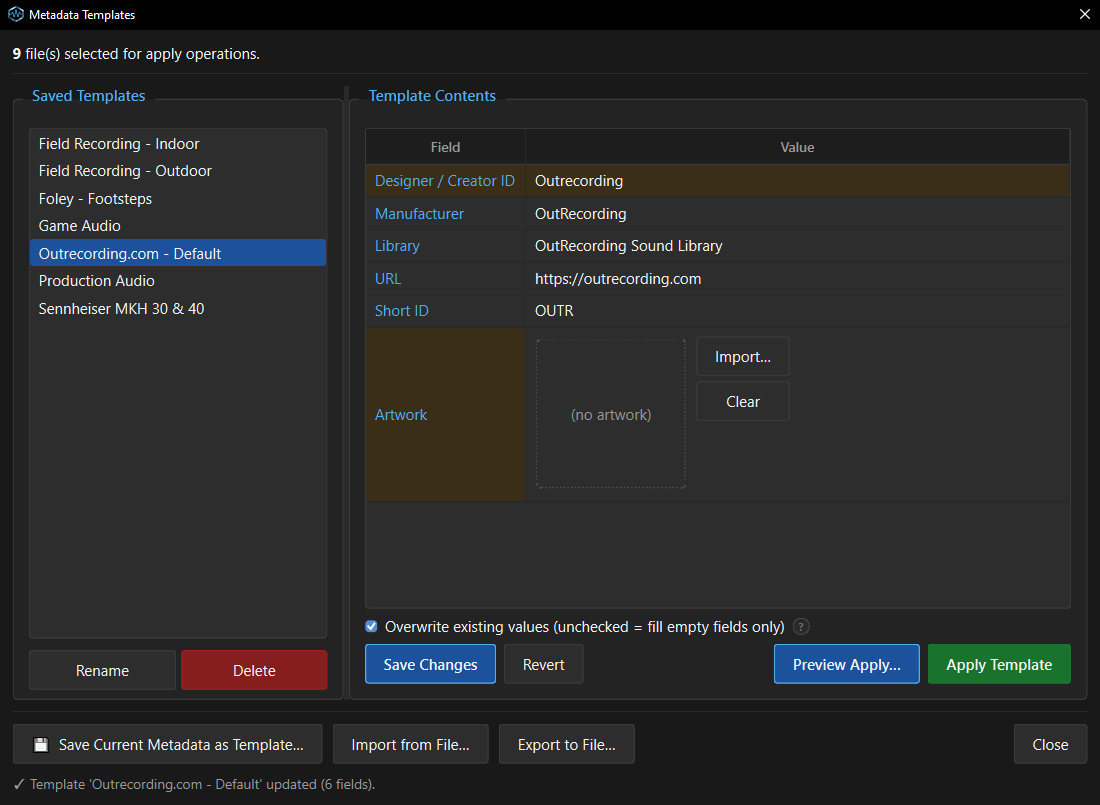
Managing Templates
- Rename - Renames the selected template.
- Delete - Removes the selected template permanently.
- Import from File… - Imports a template from a file on disk.
- Export to File… - Exports the selected template to a file for sharing or backup.
The status bar at the bottom shows the template name, field count, and when it was last saved.
UCS Batch Rename
Toolbar: UCS Batch Rename | Shortcut: Ctrl+Shift+R | Requires: Checked files
UCS Batch Rename constructs filenames from metadata fields according to the UCS naming convention and renames files on disk. For more information about the UCS file naming convention, visit https://universalcategorysystem.com/.
When the UCS Batch Rename dialog first opens, no files are loaded - the table is empty. Click Preview to load the files you checked in the main window and generate the rename preview. If any of those files are missing mandatory UCS fields (CatID, Creator ID, FX Name, Source ID), a warning appears at this point, and those files are marked INVALID in the preview.
Once the preview is loaded, the table updates live as you adjust optional fields, case, or sequence settings - there is no need to click Preview again.
Filename Structure
The top of the dialog shows the assembled filename structure with each component as a labeled token:
CatID _ FX Name _ Creator ID _ Source ID (.wav)
The four core components (Cat ID, FX Name, Creator ID, Source ID) are mandatory fields according to the UCS naming convention and are always included. Three optional components can be toggled by clicking their buttons:
- User Category - Appended to Cat ID with a hyphen (e.g., "DSGNDron-MyCategory")
- Vendor Category - Prepended to FX Name with a hyphen (e.g., "VendorCat-FX Name")
- User Data - Appended as a final segment after Source ID
When an optional field is active, its button turns blue and the token appears in the filename structure at the top.
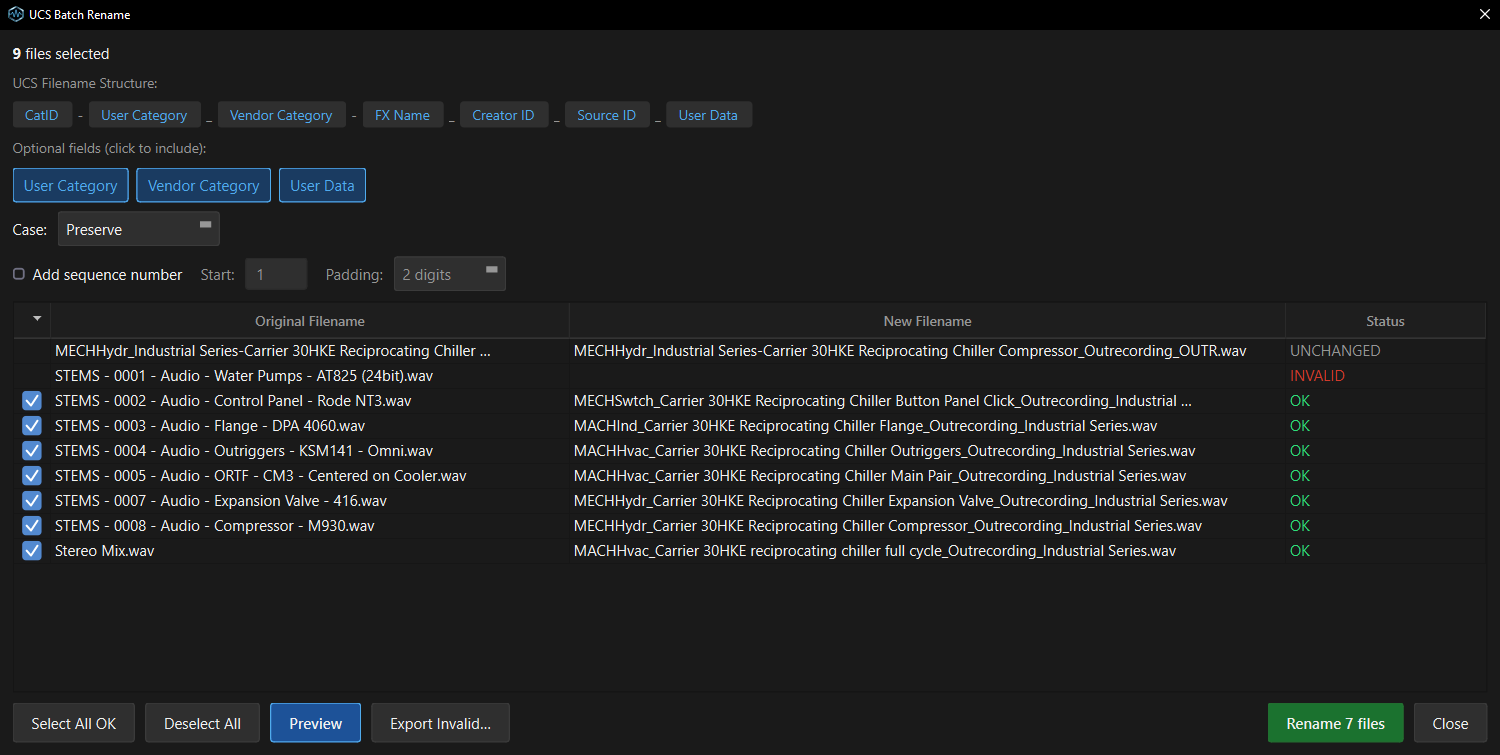
Case Option
The Case dropdown controls how the assembled filename is cased:
- Preserve - Keeps the original case from each field value (default).
- UPPERCASE - Converts the assembled filename to all uppercase.
- lowercase - Converts the assembled filename to all lowercase.
Sequence Numbering
The Add sequence number checkbox enables automatic numbering for files that would otherwise have identical names. When enabled:
- Start - The starting number (default: 1).
- Padding - The minimum digit width (default: 2 digits, e.g., "01", "02").
Numbering is group-based: only files whose assembled names are identical receive sequence numbers. Files with unique names are left unchanged. Each group of duplicates gets its own counter starting from the Start value.
Preview Table
The preview table shows every checked file with four columns:
| Column | Description |
|---|---|
| Checkbox | Check/uncheck individual files to include or exclude them from the rename. |
| Original Filename | The file's current name on disk. |
| New Filename | The assembled UCS filename. |
| Status | Color-coded status indicator. |
Status values:
- OK (green) - The file will be renamed.
- UNCHANGED (grey) - The new name matches the current name. No action needed.
- CONFLICT (red) - Two or more files would receive the same new name. Enable sequence numbering to resolve, or manually adjust field values in the main window and re-embed.
- INVALID (red) - The filename cannot be constructed (missing required fields, or uses a Windows reserved name like NUL or CON).
Select All OK checks only files with OK status. Deselect All unchecks all files.
Exporting Invalid Files
When one or more files show INVALID status (missing or malformed mandatory UCS fields), an Export Invalid… button appears to the right of the Preview button. It does not appear when all files are valid.
This button exports just the invalid files to a spreadsheet, with the problem fields highlighted so the specific issues are easy to find. Rather than hunting through a large batch for the few files that need fixing, the user can fill in the missing or corrected values in the spreadsheet, save it, then import and commit it through the Spreadsheet dialog. A confirmation dialog shows how many invalid files were exported and where.
Renaming
Click Rename N files to execute the rename on disk. Only checked files with OK status are renamed. A confirmation is shown before proceeding.
Trailing dots are stripped from assembled names (Windows does not allow filenames ending with a period). Windows reserved names (CON, PRN, AUX, NUL, COM1–COM9, LPT1–LPT9) are flagged as INVALID and cannot be renamed.
Spreadsheet Round-Trip
Toolbar: Spreadsheet | Shortcut: Ctrl+Shift+C
The Spreadsheet tool exports metadata to an XLSX spreadsheet for bulk editing in Excel or any spreadsheet application, then imports the modified spreadsheet back to update files. It has two tabs: Export and Import / Merge.
Unlike other batch tools, the Spreadsheet does not require files to be checked. It can operate on all files currently in the file list, or scan a folder independently.
Export
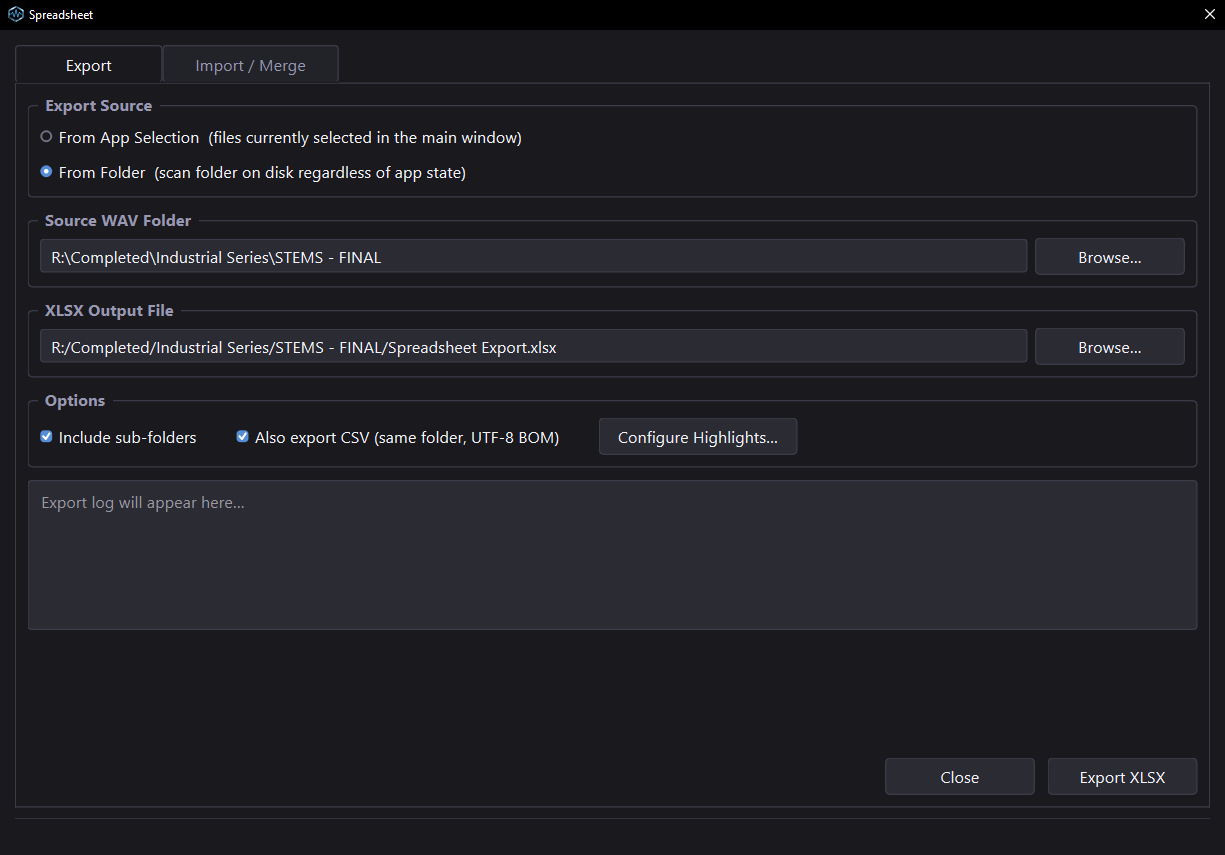
Export Source - Two options:
- From App Selection - Exports metadata from the files currently in the main window's file list. If any files are checked, only the checked files are exported; otherwise all files in the list are exported.
- From Folder - Scans a folder on disk for WAV files, independent of what is loaded in the main window. When this option is selected, a Source WAV Folder field appears (type a path or Browse), and an "Include sub-folders" checkbox appears in the Options row - checked by default, so subfolders are scanned unless you untick it.
XLSX Output File - Click Browse… to choose where to save the spreadsheet. The file must have an .xlsx extension.
Options:
- Also export CSV - Additionally exports a UTF-8 CSV file (with BOM) to the same folder as the XLSX file.
- Configure Highlights… - Opens a dialog where specific fields can be selected for empty-cell highlighting. When the spreadsheet is generated, any cell in a highlighted column that is empty receives a colored background, making it easy to spot missing data at a glance.
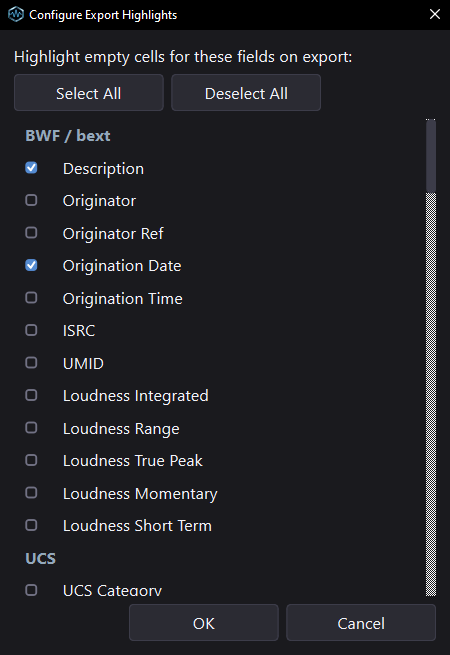
Click Export XLSX to generate the spreadsheet. An export log at the bottom of the dialog shows progress and the final result.
The exported spreadsheet contains a Metadata sheet with all editable fields as columns (88 columns). Priority fields appear first. Files are grouped by folder and sorted alphabetically within each group. A Filepath column is included to handle duplicate filenames across different folders. The header row is frozen and AutoFilter is enabled, so columns can be filtered directly in Excel without additional setup.
Sheet protection: The exported sheet is lightly protected to prevent accidental edits to column headers and stray pasting beyond the data range. Filter by Color and Text Filters in the column dropdown work without any additional steps. Sort A→Z, Sort Z→A, and Sort by Color are blocked while the sheet is protected - Excel requires unprotected cells in the sort range. To enable sorting, right-click the sheet tab and choose Unprotect Sheet (no password is set).
File lock pre-check: If the output file already exists and is open in another application, WAVScribe detects this immediately and shows an error before attempting to write - rather than failing mid-export.
Open Folder Button: After a successful export, an Open Folder button appears in the bottom button row. Clicking it opens the folder containing the exported file in Windows Explorer - useful for locating the output without leaving WAVScribe. The button is hidden when the dialog first opens and only appears after a completed export.
Data integrity in Excel: Date-like strings in text fields (e.g., "2024-01-15" in a Description) are preserved as text and not auto-converted to Excel date serial numbers.
Why some CSV values appear as ="...": When WAVScribe exports a CSV, some values are written in a protective form that looks like this: ="018". This is deliberate. Spreadsheet applications automatically convert certain values when a CSV is opened and saved: a take number of 018 becomes 18, a scene of 1-10 becomes a date, and very long digit strings are rewritten in scientific notation. Once that happens, the original value cannot be recovered. The ="..." form tells the spreadsheet to treat the value as text, which preserves it exactly.
What you see depends on your spreadsheet application. Excel evaluates the wrapper and displays the clean value (018) - you will never see the ="..." form in the grid. Other spreadsheet applications may display the wrapper literally (="018") depending on their CSV import settings; this is harmless, as the value is preserved either way.
You do not need to do anything with wrapped values. WAVScribe removes the wrapper automatically when the CSV is imported back. Two practical notes:
- To edit a wrapped value where it displays literally, change only the text inside the quotes.
- To type a new value with a leading zero (for example, changing a take to 019), enter it as
="019"or format the column as Text first. Typing 019 into a normally formatted cell converts it to 19 before WAVScribe ever sees it - this is spreadsheet behavior and applies to any CSV workflow.
Values that are already plain numbers, such as loudness readings, are exported without the wrapper so they remain sortable in the spreadsheet. If you work with extremely long all-digit values (longer than about 20 digits), the XLSX round-trip is the safest route - XLSX stores every value as true text and is immune to these conversions.
UMID and CSV export: UMID values are omitted from CSV exports. UMID is a 128-character hexadecimal identifier, and Excel converts long all-digit hex strings to scientific notation when a CSV is opened and saved (e.g., a 128-character UMID becomes 2E+126). The conversion is irreversible, so re-importing the saved CSV would replace the original UMID with a corrupted value. To edit UMID in a spreadsheet, use the XLSX export - XLSX preserves cell types and survives Excel's open/save cycle without corrupting long identifier strings. UMID can also be edited directly in the WAVScribe UI. Importing a CSV without a UMID column does not affect the UMID stored in the WAV files; existing UMIDs are preserved unchanged.
Export Aborted - Cell Size Limit: If any exported cell contains more than 32,767 characters, WAVScribe aborts the export before writing anything and shows the "Export Aborted" dialog. This applies to both XLSX and CSV exports. The dialog lists the offending file(s), field name(s), and character count for each affected cell; a Copy List button copies this list to the clipboard.
Why the limit applies to both formats: XLSX enforces a per-cell character ceiling of 32,767. CSV has no format-level cell limit, but a CSV containing a cell that large corrupts when opened in a spreadsheet program - the oversized cell spills into adjacent rows and the file's structure is mangled on save. Refusing both formats prevents the user from ending up with a corrupted spreadsheet.
To proceed, shorten the affected field(s) in WAVScribe or at the source, then re-export. This is uncommon; the fields most likely to grow this large in practice are long free-text fields such as Keywords, Notes, and Description, which can accumulate size through library aggregation or paste-ins.
Import / Merge
The Import / Merge tab reads a modified spreadsheet back and applies changes to WAV files on disk. Both metadata fields and filenames can be edited in the spreadsheet - see "Renaming Files" below.
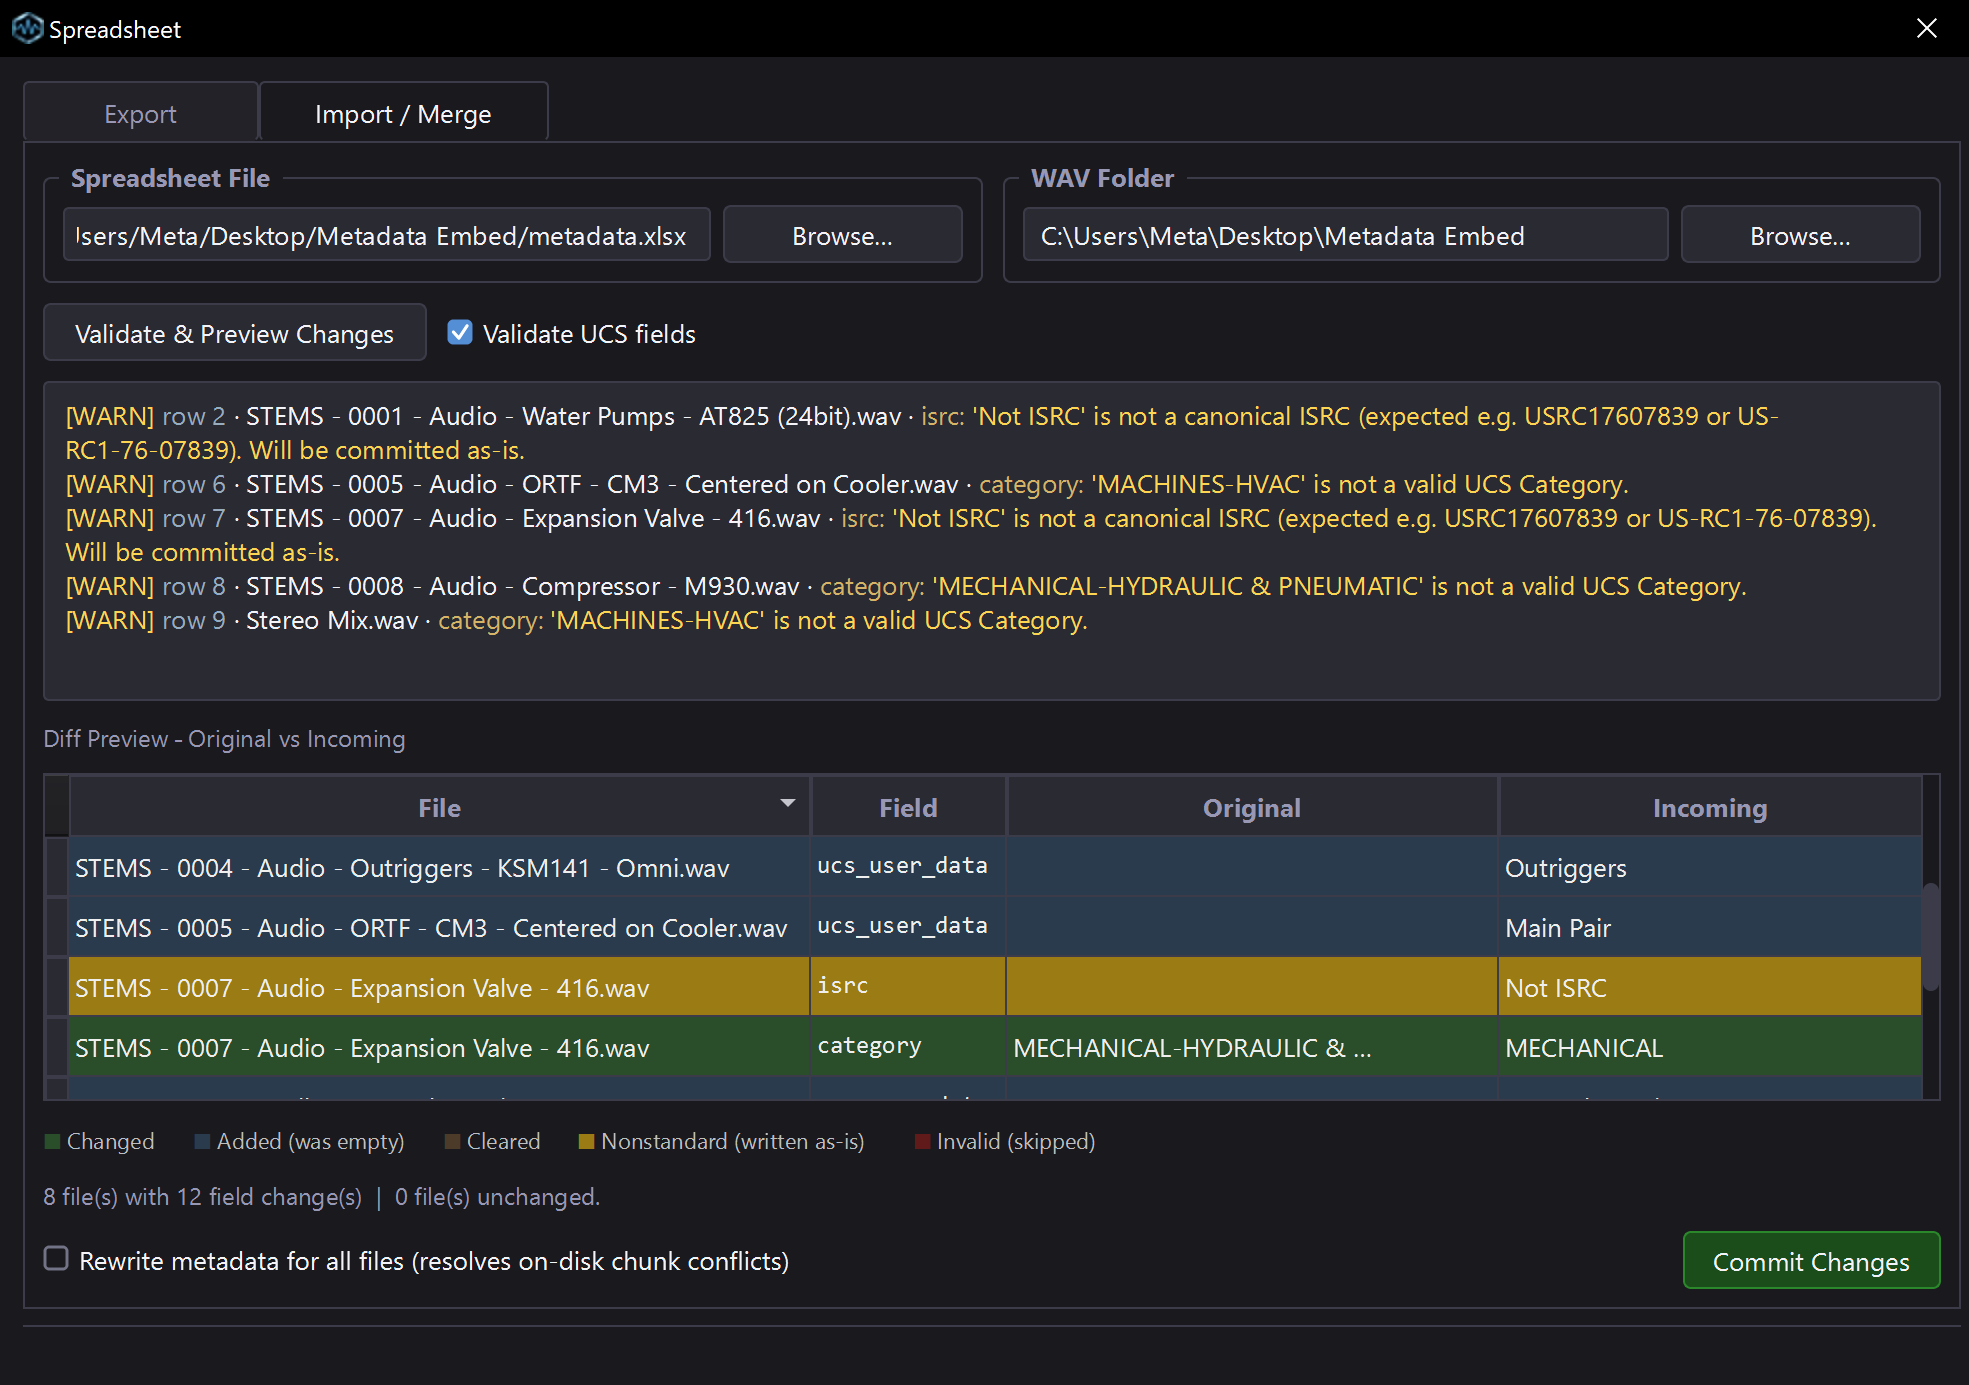
Spreadsheet File - Click Browse… to select the XLSX or CSV file to import.
WAV Folder - Click Browse… to select the folder containing the WAV files referenced in the spreadsheet. WAVScribe matches files by filepath first (for duplicate filename handling), then by filename.
Validate UCS fields - When checked, the import validates Category and Cat ID values against the UCS v8.2.1 tables and reports non-compliant entries as warnings.
Click Validate & Preview Changes to process the spreadsheet. Two areas populate:
Validation log - Shows any issues found during import, color-coded:
- Amber
[WARN]entries indicate non-fatal issues (e.g., a Category value that isn't in the UCS table). These do not block the import. - Red
[ERROR]entries indicate problems that prevent specific rows from being committed (e.g., file not found on disk).
Diff Preview table - Shows every change that will be made, organized by file. Each row shows the filename, field name, original value, and incoming value from the spreadsheet. Cells are color-coded:
- Green - Changed: the field has an existing value that will be replaced with a different value.
- Blue - Added: the field was empty and will be populated.
- Amber - Cleared: the field had a value that will be removed (the spreadsheet cell was empty).
- Yellow - Nonstandard: the incoming value does not conform to the expected format (e.g., a date not in YYYY-MM-DD format). The value will be written as-is - this is a warning, not a block.
- Red - Corrupting / skipped: the value would produce invalid binary data (e.g., a non-hex UMID). This row is excluded from the commit; the existing file value is preserved.
The summary bar shows the total count: "3 file(s) with 3 field change(s) | 5 file(s) unchanged."
Export Invalid - If validation issues were found, an Export Invalid button appears. Clicking it exports only the problematic rows to a separate XLSX file with invalid cells highlighted, making it easy to review and correct issues in a spreadsheet editor before re-importing.
Important: Empty cells clear values. When a spreadsheet cell is empty for a field that currently has a value in the WAV file, importing that spreadsheet will clear that field. This matches the behavior of other metadata management tools in the industry. It is not a bug - it allows deliberate bulk-clearing of fields by deleting cell contents in the spreadsheet.
Renaming Files
The filename column in the exported spreadsheet is editable. Changing a filename cell and re-importing renames the file on disk during the commit pass - in the same operation that writes any metadata changes for that file. Files queued for rename without metadata edits are renamed only; their chunks are not rewritten by default. See the Rewrite metadata for all files checkbox under Committing Changes for the option to rewrite every file in the commit.
To rename a file, change the value in the filename column for that row and save the spreadsheet. The .wav extension must remain; case differences (.wav, .Wav, .WAV) are accepted. The filepath column identifies the row's source file and must not be edited or blanked - if the filepath column is removed or altered, rows will fail to match.
In the diff preview, renames appear inline in the File column using arrow notation:
Take01.wav → Take02.wav
Files that are not being renamed show only their original filename.
Validation rules - block a row from committing:
- Empty filename or empty filepath cell
- Filename contains illegal Windows characters:
\ / : * ? " < > | - Filename stem is a Windows reserved device name (CON, PRN, AUX, NUL, COM0–COM9, LPT0–LPT9)
- Filename extension differs from the original (extension changes such as
.wavto.mp3are not supported)
Conflict detection - blocks the entire commit:
- Two or more rows target the same new filename (in-batch duplicate)
- A new filename matches an existing file in the same folder that is not also being renamed away in this batch (on-disk collision)
When conflicts are detected, a Rename Conflicts dialog lists them so they can be resolved in the spreadsheet before re-importing.
Chained and cyclic renames are supported. For example, Take01 → Take02, Take02 → Take03, Take03 → Take01 resolves correctly. WAVScribe uses an internal temporary-file pass during commit so chains and cycles complete safely. Case-only renames (e.g., take01.wav → TAKE01.wav) also work via this temporary-file pass - Windows otherwise treats case differences as identical filenames.
Limitations:
- Renames cannot be undone. WAVScribe's Undo Last Embed restores metadata only, not filesystem changes. This matches the behavior of the UCS Batch Rename tool.
- Extension changes are not supported.
- Files cannot be moved between folders by editing the filepath column. The file must remain in its original folder.
Tip - mass renames: For renaming many files, build the new filenames in a separate spreadsheet column using formulas (CONCAT, SUBSTITUTE, etc.), then paste the resulting values into the filename column. This is significantly faster than typing each name manually.
Committing Changes
Click Commit Changes to write all previewed changes to disk. A confirmation dialog summarizes the operation. If any rows contain nonstandard values (date/time format, ISRC format, byte-overflow fields), the dialog breaks them out by category so the user can review before proceeding. If any files are being renamed, the dialog adds a line reading "X file(s) will be renamed on disk. This rename cannot be undone." Rows with structurally corrupting values (e.g., invalid UMID) are automatically excluded from the commit - the existing file values are preserved for those fields.
Rewrite metadata for all files (resolves on-disk chunk conflicts): A checkbox to the left of the Close and Commit Changes buttons controls whether the commit rewrites files that have no field changes. The default state is unchecked, and the setting persists across sessions.
- Unchecked (default): Only files with actual field changes are rewritten. Files where the spreadsheet matches the on-disk values are skipped during the metadata pass - though they will still be renamed if a rename was queued for them. This is the fast path and the safest choice when committing a small number of edits or rename-only batches across a large library.
- Checked: Every file in the commit is rewritten, including files whose spreadsheet values match the disk. This is slower - sometimes substantially so for large batches - but has a useful side effect: any internal chunk conflicts in those files are resolved, because the rewrite unifies all chunks to the spreadsheet's values. Useful as a library-wide normalization pass or when preparing files for delivery and consistency across every file's chunks is required.
The pre-commit conflict warning's count reflects the checkbox state. When unchecked, the count includes only conflicted files that will actually be touched; when checked, it includes every conflicted file in the commit.
Each file is processed using the same single-pass write architecture as the main embed workflow - all chunk types are updated simultaneously.
The status bar confirms: "Preview ready - 3 file(s) will be modified."
Continued in Part 4: Reference - Audio player details, BWF loudness fields, file format support, keyboard shortcuts, and configuration files.
Part 4: Reference
Audio Player
The audio player basics are covered in Part 1. This section documents additional technical behavior.
Channel Handling
Playback output is mono or stereo, matching the file up to two channels. A mono file plays as mono, which Windows sends to both speakers; a stereo file plays as stereo; and files with three or more channels are mixed down to stereo.
Preview Gain
The Gain control appears in the transport bar, just left of the volume slider, whenever a float-format WAV is loaded - 32-bit or 64-bit float, including the EXTENSIBLE float layout. For integer PCM files it is absent, and playback is unaffected.
The range is -24 dB to +12 dB in whole-decibel steps, with a readout showing the current value ("0 dB", "-12 dB", "+6 dB").
Gain is applied before the point where the signal would clip, so the waveform display scales with it: lowering gain shrinks an over-loud float file's flat-topped peaks back inside the lane, and raising gain grows the waveform until its peaks reach and flatten at the lane edge. This is distinct from the volume slider, which sets output level only and does not change the waveform. The two are independent.
Each file keeps its own gain setting for the session. Switching to another file restores that file's setting, and a file that has not been adjusted starts at 0 dB. All settings return to 0 dB when WAVScribe restarts. Gain is a preview aid only and is never saved. It is not written to the file, does not affect metadata, and is not part of embedding or undo.
The control is mouse-driven. Drag the slider to adjust; a drag released within 1 dB of zero snaps to 0 dB. Double-click the slider to reset to 0 dB. The mouse wheel steps in 1 dB increments and bypasses the zero snap, so exact +1 dB and -1 dB settings are reachable with the wheel. The slider does not take keyboard focus, so the Space bar continues to control play and pause. Like the volume slider, the control shrinks when the player panel is dragged short.
RF64 / BW64 Playback
RF64 and BW64 files (64-bit WAV for files exceeding 4 GB) play back normally. Most decode directly; for layouts the decoder rejects (some post-embed files, for example), WAVScribe falls back to reading the raw PCM data. Either way this is handled transparently, with no difference in playback behavior from the user's perspective.
Stall Detection
If audio playback makes no progress for approximately 500 milliseconds, WAVScribe pauses playback and releases the audio device. This usually means another application has taken exclusive control of the device. WAVScribe shows an "Audio Device" dialog with the likely cause ("Audio device unavailable - another application may be using it"). Once the device is free, press Play to resume.
Error Handling
Playback and audio-device errors are shown as dialog messages, not in the status bar. For example, if the audio device is unavailable because another application is using it, WAVScribe shows an "Audio Device" dialog. A file whose audio cannot be decoded is handled differently and is not reported as an error: the file loads and stays fully editable, and the preview area shows "Audio preview unavailable - file remains editable" in place of a waveform (see File Format Support below).
File Switching During Playback
Selecting a different file while audio is playing stops playback of the current file. If the Auto toggle is set to ON, the newly selected file begins playing automatically. If Auto is OFF, playback stops and the new file's waveform loads silently.
BWF Loudness Fields
The five loudness fields in the BWF / Broadcast section deserve special mention: Integrated Loudness, Loudness Range (LU), True Peak (dBTP), Momentary Max, and Short-Term.
These fields are typically populated by loudness measurement tools and represent calibrated measurements of the audio content. WAVScribe can display and edit these values, but editing loudness values that were set by a measurement tool effectively overwrites measured data with a manually entered number.
To guard against accidental edits, WAVScribe shows a confirmation prompt when editing a loudness field that already contains a value. This prompt can be disabled in Preferences under "Show warning before editing loudness fields."
Technical notes:
- All loudness values are displayed with 2 decimal place precision.
- Negative Loudness Range values are flagged as nonstandard (red highlight) but are written as-is. The EBU R 128 specification defines LRA as non-negative, but WAVScribe does not block negative values from being embedded.
- Any non-zero loudness field triggers an automatic upgrade of the BWF/bext chunk to version 2.
- Three values are treated as "unset" sentinels and shown as an empty field rather than a number: 32767 (0x7FFF, the EBU R 128 "not defined" value), -32768, and 0. Because 0 marks an unset field, typing 0.0 into a loudness field is rejected.
Field Validation Rules
WAVScribe's validation follows a structural/semantic split. Structural issues block embedding because they would corrupt the file. Nonstandard values are flagged visually but written as-is if the user proceeds.
Structural - Blocks Embed
These conditions produce a hard stop. The user cannot embed until the value is fixed.
| Condition | Reason |
|---|---|
| UMID not 128 hex characters | UMID is a fixed binary field. Non-hex or wrong-length values produce an invalid chunk. |
| Loudness field: non-numeric value | Loudness is stored as a signed 16-bit integer. Non-numeric input has no safe encoding. |
| Loudness field: value exceeds int16 range | Overflows 16-bit storage. Would silently wrap or corrupt. |
| Loudness: reserved sentinel values | Reserved by the spec to indicate "not set." Writing them would conflict with their reserved meaning. |
Semantic - Warn Only (Red Highlight)
These flag the field visually with a red highlight and tooltip but do not block embedding. The value is written as-is.
| Field | Nonstandard Condition |
|---|---|
| Origination Date | Not in YYYY-MM-DD format (e.g., "circa 1990", "2024/01/15") |
| Origination Time | Not in HH:MM:SS format |
| ISRC | Does not match ISO 3901 pattern: 12 characters (CCXXXYYNNNNN) or 15 characters with hyphens (CC-XXX-YY-NNNNN) |
| Loudness Range (LU) | Negative value (EBU R 128 defines LRA as non-negative) |
UCS Compliance - Warn Only, Toggleable
These three fields are validated against the UCS v8.2.1 tables. All three respect the same Preference setting: "Highlight UCS non-compliance." Disabling this setting removes the red highlights but does not change what can be typed or embedded.
| Field | Rule |
|---|---|
| Cat ID | Must match a valid UCS v8.2.1 identifier (verified via reverse lookup) |
| Category | Must match a UCS v8.2.1 category name |
| Sub-Category | Must be a valid subcategory for the currently selected Category |
Byte-Overflow - Truncate and Warn
BWF fixed-size string fields have byte limits set by the specification. When a value exceeds its limit (via CSV import, paste, or template application - the main panel prevents typing past the limit), WAVScribe truncates at a safe character boundary preserving UTF-8 validity, and shows a post-embed summary listing the affected files and fields.
| Field | Byte Limit |
|---|---|
| Description | 256 bytes |
| Originator | 32 bytes |
| Originator Ref | 32 bytes |
| Origination Date | 10 bytes |
| Origination Time | 8 bytes |
Loudness Fields
| Field | Rule |
|---|---|
| Integrated Loudness | Must be a valid number (structural block if not) |
| Loudness Range (LU) | Must be a valid number (structural block if not). Negative values are flagged as nonstandard but not blocked. |
| True Peak (dBTP) | Must be a valid number (structural block if not) |
| Momentary Max | Must be a valid number (structural block if not) |
| Short-Term | Must be a valid number (structural block if not) |
Preferences
Three preferences control validation visibility:
| Preference | Default | Effect |
|---|---|---|
| Highlight field format errors | On | Red highlight on date, time, ISRC, UMID, and loudness fields with nonstandard values |
| Highlight UCS non-compliance | On | Red highlight on Cat ID, Category, Sub-Category for non-UCS values |
| Confirm before embedding files with nonstandard values | Off | Adds a nonstandard-values summary to the embed confirmation dialog |
File Format Support
WAVScribe supports the following WAV file variants:
-
Standard WAV (RIFF/WAVE) - full read/write
-
RF64 / BW64 (64-bit WAV for files exceeding 4 GB) - full read/write
-
32-bit float WAV - full read/write
-
Multi-channel WAV - up to 128 channels for Track Layout metadata; playback mixed to stereo; per-channel waveform display for up to 32 channels
Because WAVScribe edits metadata and not audio, the audio compression format does not affect metadata support. Any structurally valid WAV file loads and can be edited and embedded, whatever its audio codec, including compressed formats such as GSM, ADPCM, A-law, μ-law, TrueSpeech, and VoxWare. The waveform display and audio preview are a separate matter, because they need the audio to be decoded. Most formats decode and play normally. A few compressed codecs, such as TrueSpeech and VoxWare, cannot be decoded for preview; these files still load and stay fully editable, and the preview area shows "Audio preview unavailable - file remains editable" in place of a waveform.
Inconsistent RF64/BW64 files:
WAVScribe writes metadata only into structurally consistent RF64/BW64 files. If a file's internal size declarations contradict each other, WAVScribe refuses to save changes rather than risk damaging a file it cannot safely rebuild, and the file is left untouched. Files like this usually come from an interrupted recording or a faulty export; re-exporting from the original tool typically produces a consistent file.
Not supported:
- Non-WAV audio formats (MP3, FLAC, AIFF, OGG, etc.)
Chunk handling on write:
- Padding chunks (PAD, JUNK, FLLR) are preserved on a normal embed; WAVScribe does not discard them. Wipe Metadata removes padding along with the rest of the metadata, and undoing a wipe restores it.
- Unknown chunks not managed by WAVScribe are preserved on round-trip. WAVScribe does not strip data it does not recognize.
Configuration Files
WAVScribe stores all user configuration in a single directory:
%LOCALAPPDATA%\WAVScribe\
This directory can be copied to transfer your settings to another machine. WAVScribe will ask you to activate on the new machine.
| File / Folder | Purpose |
|---|---|
preferences.json |
Application settings (audio device, waveform color, validation toggles, player visibility, etc.) |
custom_fields.json |
User-defined field definitions and pinned field state for the User Defined Area |
uda_profiles.json |
Saved User Defined Area profile configurations |
templates\ |
Saved metadata templates (one JSON file per template) |
logs\ |
Application log files |
All configuration files use atomic writes (write to a temporary file, then rename) to prevent corruption if the application is interrupted during a save.
To reset any setting to its default, delete the corresponding file. WAVScribe recreates it with defaults on next launch.
The current log file can be copied to the clipboard via Help → Copy Log to Clipboard, or the log folder can be opened in Explorer via Help → Open Log Folder. These are useful when reporting issues.
Keyboard Shortcuts
This table is reproduced from Part 1 for reference.
| Shortcut | Action |
|---|---|
| Ctrl+S | Embed current file |
| Ctrl+A | Select all files in list |
| Ctrl+Z | Undo Last Embed |
| Ctrl+P | Toggle audio player panel |
| Space | Play / Pause audio (when cursor is not in a text field) |
| Ctrl+Space | Quick View metadata card |
| Ctrl+I | Extended Metadata dialog |
| Ctrl+Shift+C | Open Spreadsheet |
| Ctrl+Shift+E | Open Batch Edit |
| Ctrl+Shift+T | Open Templates |
| Ctrl+Shift+R | UCS Batch Rename |
| Ctrl+Shift+B | Manage Custom Fields |
| Ctrl+H | Find / Replace |
| Delete | Remove highlighted files from list (not from disk; when file list has focus) |
Keyboard shortcuts are also viewable within WAVScribe via Help → Keyboard Shortcuts.
Continued in Part 5: Appendix - How WAVScribe writes metadata, why metadata disappears between tools, and troubleshooting.
Part 5: Appendix
How WAVScribe Writes Metadata
When metadata is embedded, WAVScribe writes every editable field to every applicable chunk location inside the WAV file in a single atomic operation. This is what distinguishes WAVScribe from tools that only write to one or two metadata standards.
The following table shows where representative fields are written. Each row demonstrates a distinct write pattern - every field WAVScribe manages behaves like one of the rows shown. The full mapping covers 60 fields across all chunk types. Not every field is written to every location - each field is written to the locations defined by the relevant standards.
| Field | BWF/bext | iXML | iXML USER | XMP | LIST/INFO | ID3 | ASWG | Steinberg |
|---|---|---|---|---|---|---|---|---|
| Description | ✓ | ✓ 1 | ✓ | ✓ (ICMT) | ✓ (COMM) | ✓ | ||
| Category | ✓ | ✓ 2 | ✓ (IGNR) | ✓ (TCON) | ✓ | ✓ | ||
| Sub-Category | ✓ | ✓ | ||||||
| Asset Title | ✓ | ✓ (INAM) | ✓ (TIT2) | ✓ | ||||
| Origination Date | ✓ | ✓ (ICRD) | ✓ (TDRC, TYER) | |||||
| Show | ✓ | |||||||
| Scene | ✓ | |||||||
| Artwork | ✓ (APIC) |
1 Description is written to iXML USER only when the file already carries a USER DESCRIPTION entry - WAVScribe updates it but never creates one.
2 Written as the XMP genre property, derived from Category.
Most Extended fields (Show, GPS coordinates, Era, Tape, and the rest of that section) follow the Show row: they write to iXML USER only. Production fields like Scene, Take, and Project follow the Scene row: they live in the native iXML production block.
ASWG and Steinberg MediaBay extension blocks are written whenever fields mapped to them contain values. WAVScribe creates these blocks if the file does not already have them - a file never needs pre-existing ASWG or Steinberg data to gain it.
The key takeaway for users is simple: fill in the field once, and WAVScribe handles the rest. There is no need to think about which chunk type a particular tool reads from - WAVScribe writes to all of them.
Why Metadata Disappears Between Tools
A common frustration in audio production is metadata that seems to vanish when files move between tools. Understanding why this happens makes it easier to prevent.
The root cause: different tools read and write different standards.
A WAV file can contain multiple metadata blocks simultaneously - BWF/bext, iXML, XMP, LIST/INFO, and ID3 - each storing overlapping information in different formats. Most audio tools only read from one or two of these blocks, and when they write metadata, they only update the blocks they know about. The others are left stale, overwritten with empty values, or stripped entirely.
Common scenarios:
A file is tagged in a library management tool that writes to iXML and XMP. The file is then processed through an audio editor that rewrites the file from scratch on export, preserving only the BWF/bext block. The iXML and XMP data is gone - not because it was deliberately removed, but because the audio editor didn't know it was there.
Another scenario: a file has Category metadata stored in XMP. A different tool reads Category from iXML USER. Since nothing was written to iXML USER, that tool sees an empty Category field. The metadata exists - it's just in a location the tool doesn't check.
How WAVScribe addresses this:
By writing every field to every applicable location simultaneously, WAVScribe maximizes the chance that any downstream tool will find the metadata where it expects to look. It does not guarantee that other tools won't strip metadata on their own rewrites - no tool can prevent that. But it ensures that the starting point is as complete as possible.
Best practice: Always embed metadata as the final step, after all audio editing is complete. If a file must pass through a tool that rewrites it, re-embed the metadata afterward.
Frequently Asked Questions
Why is the Description field limiting what I can type? I haven't reached 256 characters yet.
The BWF specification limits Description to 256 bytes, not 256 characters. Characters outside the basic ASCII range - accented letters, Chinese, Japanese, Korean, Cyrillic, and other scripts - consume 2 to 4 bytes each in UTF-8 encoding. A string of 100 CJK characters, for example, uses 300 bytes and exceeds the limit. The main editing panel prevents typing past this limit at the keystroke level. If a longer value arrives via CSV import or template application, WAVScribe truncates at a safe character boundary (preserving valid UTF-8) and shows a summary after embed listing the affected files.
Why is Category / Cat ID showing a red highlight when I typed a valid category name?
The red highlight indicates that the value does not match the UCS v8.2.1 standard. Common reasons: the value uses a different spelling or casing than UCS expects (e.g., "armour" instead of "armor"), or it is a custom category not in the UCS table. If UCS naming is not part of the workflow, disable this validation in Preferences → Highlight UCS non-compliance. The field accepts any text regardless of this setting - the red highlight is informational only and does not block embedding.
What is the difference between Note and Notes?
Note (singular) is a production-time field stored in the iXML standard - it captures what the recordist wrote during a session ("good take," "airplane noise," "room tone"). Notes (plural) is an editorial field used by library management tools - it aggregates from multiple sources and is intended for post-production cataloging. They are separate fields. Editing one does not affect the other. See the Note vs Notes section in Part 2 for full details.
A field has an amber border. What does that mean?
An amber border indicates a metadata conflict - the same field has different values stored in different metadata blocks within the file. For example, BWF/bext might say "Heavy Door Slam" while XMP says "Door Close." Click the amber field to see all source values and choose which one to keep, type a new value, or do nothing. See the Conflict Detection section in Part 2 for the full workflow.
Why doesn't WAVScribe update the ISRF, ITCH, or ICMS fields in my LIST/INFO data?
ISRF (original media form), ITCH (technician), and ICMS (commissioned by) are LIST/INFO subchunk keys that different tools map to different concepts. Because there is no industry consensus on what these fields should contain, WAVScribe preserves them exactly as they are rather than overwriting them with potentially incorrect data. They appear in the Extended Metadata dialog (Ctrl+I) as read-only values.
I embedded metadata, but the values in the Extended Metadata dialog don't match what I typed.
The Extended Metadata dialog shows fields that are not managed by WAVScribe's main UI. If a third-party tool previously wrote a value to an unusual location (e.g., an iXML USER key that WAVScribe doesn't map to a UI field), that value is preserved as-is. WAVScribe's "do no harm" policy means it never strips or modifies data it doesn't manage. The main UI fields are authoritative for all managed locations.
What is the difference between the main editor, the Quick View Card, and the Extended Metadata dialog?
Three views, three purposes. The main editor shows your working state - including any edits you have made but not yet embedded. The Quick View Card (Ctrl+Space) shows what is actually saved on disk right now, so if you have unembedded edits, it still shows the previous saved value until you embed. The Extended Metadata dialog (Ctrl+I) shows everything WAVScribe preserves but does not manage directly - fields written by other tools and non-standard data that WAVScribe keeps but does not surface as editable fields.
Why did WAVScribe write my nonstandard date / ISRC / UMID without blocking it?
WAVScribe distinguishes between values that would corrupt the file structure (blocked - embedding is prevented) and values that are nonstandard but functional (warned via the red highlight, but written if the user proceeds). This design respects the reality that field recorders and legacy tools sometimes write values in nonstandard formats. WAVScribe shows the red highlight so the issue is visible, but the final decision to embed is the user's.
Similarly, Undo restores the previous field values - including nonstandard ones. This is by design. WAVScribe does not "correct" pre-existing data.
I imported a spreadsheet and the nonstandard values are still there. Shouldn't WAVScribe have cleaned them up?
Spreadsheet values are written as specified. If a nonstandard value was present in the spreadsheet, WAVScribe assumes it was left there intentionally and writes it. After importing, use the validation highlights (red highlight) to identify nonstandard values and correct them manually if needed. Two exceptions are mechanical rather than semantic: a value longer than a field's byte limit is truncated (as above), and a value that would corrupt the file - such as a malformed UMID - is skipped, leaving the file's existing value in place.
Empty cells in my spreadsheet cleared existing values. Is that a bug?
No - this is intentional and matches the behavior of other metadata management tools in the industry. An empty cell means "this field should be empty." This allows deliberate bulk-clearing of fields by deleting cell contents in the spreadsheet. If a field should keep its existing value, leave the original value in the cell rather than deleting it.
Can I use WAVScribe without an internet connection?
Yes. WAVScribe confirms your license online at most once a day, quietly at launch, and needs no connection between checks. If you go offline, it keeps running for a 30-day grace period measured from the last successful check - long enough for extended fieldwork away from a connection. After 30 days with no check, it asks for a connection before continuing, and one successful check resets the 30-day period. See the Licensing and Activation section below for the full details.
Do I need to deactivate before uninstalling during the trial?
No. Uninstalling keeps your remaining trial days, and they resume if you reinstall on the same computer. Deactivating is different - it ends the trial on that computer for good. See Licensing and Activation for the details.
Troubleshooting
Embedding to a Network Drive Was Interrupted
WAVScribe stays responsive while embedding to a network drive (a mapped drive letter or a UNC path), so the window keeps working even if the connection is slow. A network interruption can still cause the embed itself to fail - from a brief network blip, a NAS reboot, a sleep/wake cycle, or a hard disconnect.
What the user may see. If a network write is unresponsive for more than five seconds, WAVScribe shows a "Waiting for network drive X:" notice. The notice clears automatically if the drive recovers and the write resumes. If the write ultimately fails, the file appears in the embed results dialog with an explanation. A file with an extension ending in .tmp_wav_engine may remain in the target folder. After a hard disconnect, other files on the same drive may temporarily appear unreadable or hang when opened or copied through Windows Explorer.
Originals are safe. WAVScribe writes the new version of a file to a temporary file first and only replaces the original after the write fully completes. An interrupted embed leaves the original file exactly as it was on disk.
Leftover .tmp_wav_engine files. These are the temporary files WAVScribe uses during the write. They are safe to delete. WAVScribe also removes its own orphaned temporary files older than 24 hours automatically on the next folder load, so no manual cleanup is required in most cases.
Brief network blips. A short delay does not necessarily mean the embed will fail. If the drive recovers within the system's timeout, the embed completes normally and no error is shown.
Re-embedding after recovery. The embed results dialog lists the specific file(s) that failed. After the drive connection is restored, re-embed those files. If the drive or Windows itself seems stuck after a disconnect, see Network Drive Recovery below.
Network Drive Recovery
If a network drive disconnects while files are being written - a cable knock, a switch reboot, a NAS restart - Windows itself can be left holding the dead connection open. When that happens you may see: This PC hanging or going blank, drives no longer appearing, file dialogs stalling, or WAVScribe reporting the drive as offline or stalled even after it is physically reconnected. This is a Windows network condition, not file damage. Your originals are protected - WAVScribe only replaces a file after its new copy is fully written.
Signs of this condition include:
- WAVScribe pauses during a save or batch operation on a network drive and shows a waiting message ("Waiting for network drive...").
- A drive disappears from the Folders panel, or the panel is empty when WAVScribe starts - including local drives.
- File Explorer or This PC becomes slow or stops responding when browsing the drive.
- A results report mentions that a network drive stopped responding during the operation.
What to do. Try these in order:
- Check the physical link first - cable, drive power, network switch or router.
- Give Windows a minute or two. It can take that long to release an unreachable drive, and WAVScribe continues automatically once it does.
- If you can reach the drive itself, shut it down properly - use its own power button or its admin page, not by pulling its power. In testing this often released Windows within seconds: a drive that shuts down cleanly announces the disconnection, which an unplugged cable cannot do. Windows reacts immediately - stuck windows close, drives reappear, and This PC responds again. You can then power the drive back on and reconnect normally.
- If nothing clears it, restart the computer. Once Windows restarts, the stuck connection is released and the drives are available again.
After a network drive reconnects, the first file WAVScribe writes to it may take a minute or two while Windows re-establishes the connection. Progress will appear to move slowly - this is normal and does not indicate a problem.
Two related notes. After a network disconnect, WAVScribe may take longer than usual to close, and ending it from Task Manager can take a minute or two to complete - this resolves on its own once Windows releases the drive. And if files on a network drive remain locked or unopenable after recovery, restarting the file service on the drive's admin interface (or the device itself) releases them.
If the Folders panel is empty at startup. If a network drive is stalled at the moment WAVScribe starts, the Folders panel can stay empty - including local drives - until Windows releases the stuck drive. This is the same condition described above, not a separate fault. Clear or disconnect the drive, then restart WAVScribe.
Licensing and Activation
WAVScribe uses a perpetual license. You purchase it once and it does not expire - there is no subscription. One license activates on up to two computers at a time, so you can run it on, for example, a desktop and a laptop. WAVScribe confirms your license online from time to time, but it is built to stay out of your way and works offline for extended periods (see Working Offline below).
You can check your license at any time from the Help button. License... opens a dialog with your license details, the name of this installation, and the date it was last validated. View License Agreement opens the license agreement.
Activating WAVScribe
The first time you launch WAVScribe without a license, it asks you to activate. Enter your license key. This step needs an internet connection.
Because a license covers two computers, activating on a third is refused. If that happens, WAVScribe explains what to do: deactivate WAVScribe on one of your existing computers (see Moving to a New Computer below), or, if an old computer is gone and you can no longer deactivate it, email licensing@wavscribe.com and the activation count will be reset for you.
Free Trial
WAVScribe starts with a free 7-day trial. The trial is full-featured, with every part of the program working, and it runs on one computer. You receive a trial license key and enter it in the activation dialog, exactly as you would a purchased key - there is one installer for everyone, and activating the trial needs an internet connection. A paid license is available at wavscribe.com.
During the trial. The title bar shows the time remaining, for example "WAVScribe - Trial (5 days left)", and reads "WAVScribe - Trial (1 day left)" on the final day. The License... dialog, opened from the Help button, shows a Trial expires row with the expiry date; a paid license has no such row.
As the trial nears its end. When two days or less remain, a Trial Ending Soon notice appears shortly after launch, once per launch. Purchase License opens wavscribe.com in your browser, and Continue Trial closes the notice so you can carry on. The wavscribe.com address in the notice is a clickable link.
When the trial ends. At the first launch after the trial expires, a Trial Ended window opens in place of the program. Enter License Key opens the activation dialog, so a purchased key takes effect at once, and Quit closes WAVScribe. This works the same offline: the trial ends on schedule whether or not the computer is online.
One trial per computer. A computer that has already run a WAVScribe trial cannot start another one, and WAVScribe points you to a purchase instead. Uninstalling and reinstalling does not grant a new trial.
Uninstalling during the trial. Uninstalling does not end your trial. The remaining days are kept and resume if you reinstall on the same computer, so you do not need to deactivate before uninstalling. Deactivating is the opposite: opening the License... dialog from the Help button and clicking Deactivate This Installation ends the trial on that computer, and it cannot be restarted there.
Buying a license. Once the trial has ended, choose Enter License Key in the Trial Ended window and enter your purchased key. To switch over earlier, while the trial is still running, first buy your license, then open the License... dialog from the Help button, click Deactivate This Installation, restart WAVScribe, and enter the paid key in the activation dialog. Because deactivating ends the trial, switch early only after you have bought a license.
Moving to a new computer
To move your license from one computer to another:
- On the old computer, open the Help button, choose License..., and click Deactivate This Installation. This frees the activation and needs an internet connection.
- On the new computer, launch WAVScribe and activate as normal.
If the old computer is dead, lost, or otherwise unreachable, you cannot deactivate it yourself. Email licensing@wavscribe.com and the activation count will be reset.
Copying your WAVScribe settings to another computer is safe and supported. Your license does not travel with your settings, so the new computer simply asks you to activate.
Working offline
WAVScribe does not need a constant internet connection. It confirms your license quietly in the background, at most once every 24 hours, when you launch it. Between those checks, no internet is needed.
If WAVScribe cannot reach the internet, it keeps working. You have a 30-day offline grace period, measured from the last successful check, during which WAVScribe runs fully offline. For anyone working away from a connection - a month in the field, for example - WAVScribe keeps running normally the whole time.
After 30 days with no successful check, WAVScribe asks for a connection before it will continue. At launch it shows an "Internet Connection Required" prompt with Retry and Quit. One successful check clears this and resets the 30-day period.
If a license is revoked or found to be invalid, WAVScribe shows "License No Longer Valid" at launch, along with the support address.
Reinstalling
Uninstalling or reinstalling WAVScribe does not remove your license. The installer never touches your user data. Reinstalling on the same computer needs no reactivation.
Your privacy
When you activate, WAVScribe registers only a redacted name for the installation: the operating system name followed by six characters derived from a one-way hash of your computer's name, for example "Windows-A3B9F2." Your actual computer name never leaves your machine. This is deliberate - activation needs to tell your two installations apart, and this does that without sending any identifying information about your computer.
Reminders
WAVScribe is built to protect your files. Every metadata write is atomic - the new version is written to a temporary file and swapped in only after the write fully completes, so a crash, disconnect, or power loss mid-write leaves your original file untouched. Your audio data is never altered.
No software replaces good habits, though. Keep current backups of your recordings - especially irreplaceable masters - as standard practice before large batch operations. And note that file renames, unlike metadata embeds, cannot be undone.
- Embed last. Always embed metadata after all audio editing is complete. Some audio editors rewrite files from scratch on export, which can strip metadata.
- Undo is single-level and in-memory. It is lost when the application closes or when another embed occurs.
- Unknown chunks are preserved. WAVScribe never strips data it does not recognize. The file's internal layout may be normalized on write - for example, multiple iXML chunks consolidate into one - but data WAVScribe does not manage is never discarded.
End of WAVScribe User Manual.